Configure resource limits for local sessions
This guide walks through configuring per-session CPU and memory limits for Posit Workbench sessions that run locally on the Workbench host. These are sessions managed by the default Local Launcher Plugin rather than an external backend like Kubernetes or Slurm. By the end, your users will see predefined resource profiles when launching sessions, and Workbench will enforce the selected limits through Linux cgroups v2.
For a preview of what users see when launching sessions, see Environment options.
If your sessions run on an external backend, see Kubernetes resource profiles or Slurm resource profiles.
Prerequisites
Before you begin, ensure you have:
- A working Workbench installation that runs sessions locally on the host using the default Local Launcher Plugin rather than Kubernetes or Slurm
- Root or sudo access to the Workbench server
- A Linux distribution with cgroups v2 support (Ubuntu 22.04+, Red Hat Enterprise Linux (RHEL) 9+, or RHEL 8 with manual cgroup v2 enablement)
This guide covers cgroup-based Launcher profiles (launcher.local.profiles.conf). For the legacy ulimit-based system in /etc/rstudio/profiles, see User and Group Profiles.
Step 1: Configure cgroups v2 on your server
Resource limits require Linux cgroups v2 with CPU controller delegation. The required configuration depends on your Linux distribution.
Ubuntu 22.04 and later ship with cgroups v2 enabled and all controllers delegated. No additional configuration is needed.
Verify that cgroups v2 is active using the following command:
Terminal
stat -fc %T /sys/fs/cgroupExpected output: cgroup2fs. If you see tmpfs instead, your system might be using cgroups v1. Consult your system administrator.
RHEL 9 and 10 enable cgroups v2 by default, but only delegate memory and pids controllers to non-privileged users. You must delegate the cpu and cpuset controllers to enforce CPU limits using the following commands:
Terminal
sudo mkdir -p /etc/systemd/system/user@.service.d/
cat <<EOF | sudo tee /etc/systemd/system/user@.service.d/delegate.conf
[Service]
Delegate=cpu cpuset memory pids
EOF
sudo systemctl daemon-reload
RHEL 8 does not enable cgroups v2 by default. Enable it by running:
Terminal
sudo grubby --update-kernel=ALL --args="systemd.unified_cgroup_hierarchy=1"Set DefaultCPUAccounting=yes in /etc/systemd/system.conf:
/etc/systemd/system.conf
[Manager]
DefaultCPUAccounting=yes
Reboot the server for both changes to take effect:
Terminal
sudo rebootStep 2: Determine how your sessions are placed in cgroups
Before enabling cgroups in Workbench, you must determine whether PAM sessions with pam_systemd are already placing your sessions in their own cgroup. This changes how — and whether — you enable cgroups in Workbench, so complete this check first.
Normally the Local Launcher starts each session in a cgroup it creates and manages under the rstudio-launcher service. But if you use PAM sessions and your PAM profile loads pam_systemd, then systemd-logind intercepts the login and places the session in a per-user user.slice cgroup instead. When that happens, any cgroup the Launcher creates is ignored, so enable-cgroups=1 has no effect. Workbench instead applies your configured limits directly to the user.slice cgroup that pam_systemd created.
Check whether pam_systemd manages your session cgroups
Check whether PAM sessions are enabled. Look for
auth-pam-sessions-enabled=1in/etc/rstudio/rserver.conf:Terminal
grep auth-pam-sessions-enabled /etc/rstudio/rserver.confIf PAM sessions are not enabled,
pam_systemdis not involved. Skip to the standard setup below.If PAM sessions are enabled, check whether your PAM profile loads
pam_systemd. Workbench uses the/etc/pam.d/suprofile by default (or your custom profile if you configured one):Terminal
grep -r pam_systemd /etc/pam.d/Confirm the actual placement from a running session. Open a Terminal inside an IDE session and run:
Terminal
cat /proc/self/cgroupIf the output points at the Launcher service,
pam_systemdis not managing the session cgroup. Follow the standard setup:0::/system.slice/rstudio-launcher.serviceIf the output points at a
user.slicepath,pam_systemdis managing the session cgroup. Follow the pam_systemd setup:0::/user.slice/user-<uid>.slice/session-<n>.scope
Standard setup: enable cgroups in Workbench
Use this path when pam_systemd is not managing session cgroups. To determine if this is applicable to you, follow the steps in the Check whether pam_systemd manages your session cgroups section.
Add enable-cgroups=1 to the [server] section of /etc/rstudio/launcher.conf:
/etc/rstudio/launcher.conf
[server]
enable-cgroups=1
Set session-quit-child-processes-on-exit=1 in /etc/rstudio/rsession.conf to ensure child processes stop when a session exits:
/etc/rstudio/rsession.conf
session-quit-child-processes-on-exit=1Restart the Launcher to apply changes:
Terminal
sudo rstudio-launcher restartIf sessions fail to launch with “Could not configure resource limits” after this step, verify that cgroups v2 is enabled on your server (see Step 1). Check the Launcher logs at /var/log/rstudio/launcher/rstudio-local-launcher*.log for details.
pam_systemd setup: do not enable cgroups in Workbench
Use this path when pam_systemd is managing session cgroups. To determine if this is applicable to you, follow the steps in the Check whether pam_systemd manages your session cgroups section.
Do not set enable-cgroups=1 in /etc/rstudio/launcher.conf in this configuration. Because systemd-logind places the session in a user.slice cgroup, any cgroup the Launcher creates is ignored and enable-cgroups=1 has no effect. Leave enable-cgroups unset (or 0).
You do not need to enable cgroups explicitly. Workbench applies the resource profiles and limits you define in Step 3 and Step 4 directly to the user.slice cgroup that pam_systemd creates for the user.
Set session-quit-child-processes-on-exit=1 in /etc/rstudio/rsession.conf to ensure child processes stop when a session exits:
/etc/rstudio/rsession.conf
session-quit-child-processes-on-exit=1Restart the Launcher to apply changes:
Terminal
sudo rstudio-launcher restartWith pam_systemd, resource limits are enforced on the user’s shared user.slice cgroup, so they apply to all of a user’s sessions on a node collectively, not to each session individually. When a user starts a second session on the same node, that session joins the user.slice cgroup created for their first session rather than getting its own. As a result, every session a user is running on that node shares the configured CPU and memory limits.
Step 3: Define resource profiles
Resource profiles are named CPU and memory combinations that users select when launching a session. Create or edit the resources configuration file:
/etc/rstudio/launcher.local.resources.conf
[standard]
name = Standard (1 CPU, 4 GB RAM)
cpus=1
mem-mb=4096

[medium]
name = Medium (2 CPUs, 8 GB RAM)
cpus=2
mem-mb=8192

[large]
name = Large (4 CPUs, 16 GB RAM)
cpus=4
mem-mb=16384
Profiles appear in the session launcher dropdown in the order listed in this file. Workbench pre-selects the first profile as the default.
Adjust these values based on your server’s total resources and expected concurrent sessions. For guidance on sizing, see Sizing and Capacity Planning.
Positron Pro sessions require approximately 2.5 GB of RAM before any user workloads. If your users run Positron Pro, set your smallest resource profile to at least 4 GB of memory. See Allocate sufficient memory for Positron Pro for details.
Step 4: Set user and group limits
The /etc/rstudio/launcher.local.profiles.conf file defines per-user and per-group resource limits and access controls for the Local Launcher Plugin. Section types: [*] (all users), [@groupname] (Unix groups), [username] (individual users). When a user matches multiple sections, settings from a more-specific section override less-specific ones ([username] > [@groupname] > [*]). At the same precedence level (for example, a user who belongs to two groups), sections appearing later in the file override earlier ones. To combine max-cpus and max-mem-mb across matched sections instead, see Resource limit resolution (Preview). The launcher.local.resources.conf file defines the resource profiles referenced here. Adjust the settings and user and group information below according to your organization’s requirements.
/etc/rstudio/launcher.local.profiles.conf
#-----------------------------------------------------------------------------------------#
# Global Defaults
#
# https://docs.posit.co/ide/server-pro/admin/job_launcher/local_plugin.html#local-profiles
# Apply conservative defaults for all users unless overridden by group or user sections.
#-----------------------------------------------------------------------------------------#
[*]
default-cpus=1
default-mem-mb=4096
max-cpus=8
max-mem-mb=16384
resource-profiles=standard,medium,large
allow-custom-resources=0

#-----------------------------------------------------------------------------------------#
# Group-Based Profiles
#
# https://docs.posit.co/ide/server-pro/admin/job_launcher/local_plugin.html#local-profiles
# Grant different resource tiers to different teams.
#-----------------------------------------------------------------------------------------#

# Data science team with regular resources, but the ability to specify custom resource configurations
[@data-science]
default-cpus=1
default-mem-mb=4096
max-cpus=8
max-mem-mb=32768
resource-profiles=standard,medium,large
allow-custom-resources=1

# Power users with full profile access and custom resources with no limits
[@posit-admins]
default-cpus=1
default-mem-mb=4096
resource-profiles=standard,medium,large
allow-custom-resources=1

#-----------------------------------------------------------------------------------------#
# Individual User Profiles
#
# https://docs.posit.co/ide/server-pro/admin/job_launcher/local_plugin.html#local-profiles
# Override settings for specific users.
#-----------------------------------------------------------------------------------------#

# Example individual user override
[jsmith]
default-cpus=1
default-mem-mb=4096
max-cpus=24
max-mem-mb=65536
resource-profiles=standard,medium
allow-custom-resources=1When you set allow-custom-resources=0, you must also assign at least one named resource profile via resource-profiles. Without a named profile, sessions fail to launch.
Restart the Launcher after making changes:
Terminal
sudo rstudio-launcher restartFor a complete reference on profile settings, precedence rules, and per-user overrides, see User and Group Profiles.
Step 5: Verify resource limit enforcement
When you have correctly configured Workbench with resource limits and profiles, the resource profile dropdown in the New Session dialog shows your defined profiles.
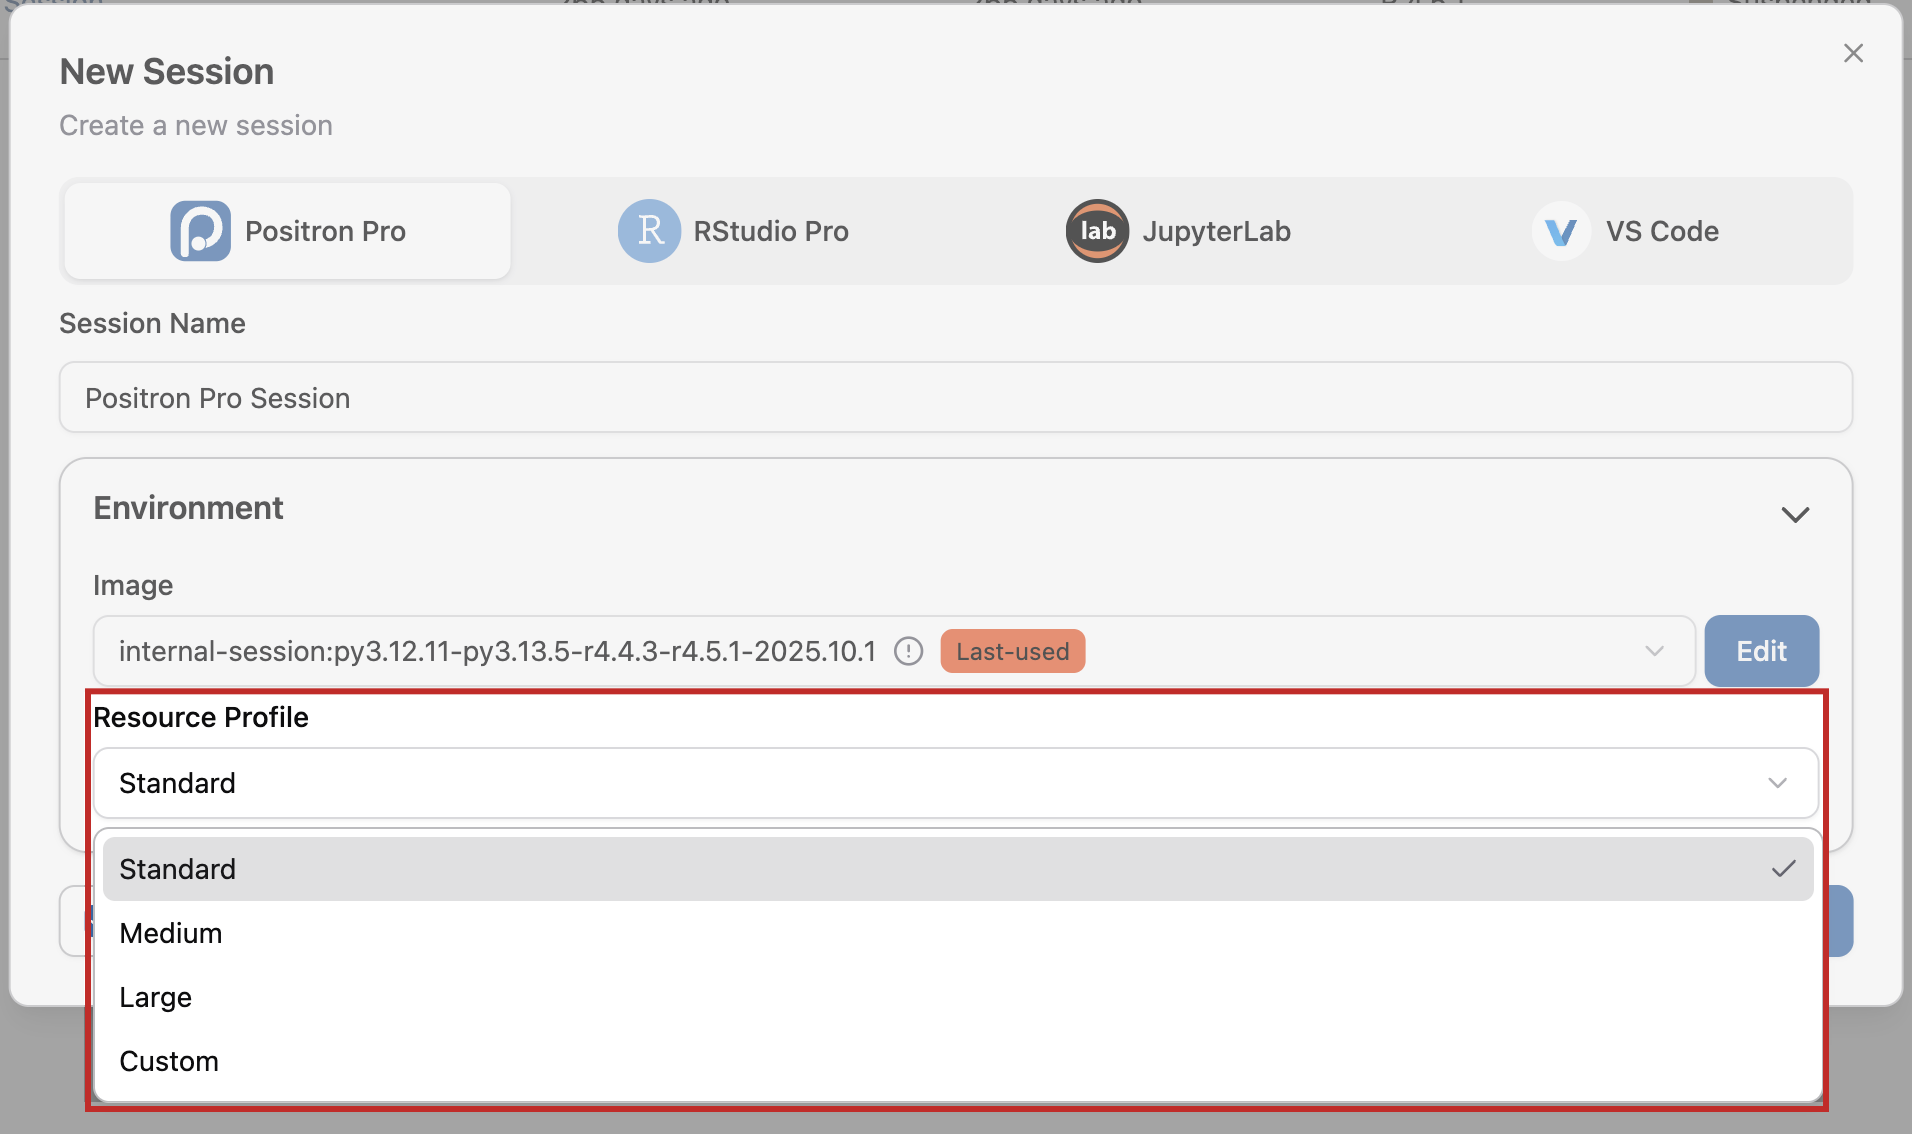
You can verify enforcement of cpu.max and memory.max limits as follows.
Find the session’s cgroup path
The exact cgroup path depends on how the session is placed: whether the Local Launcher manages it, pam_systemd manages it, or another Job Launcher plugin configures it. Rather than assume a layout, read the path directly from the session’s process.
From a Terminal inside the IDE session, run:
Terminal
cat /proc/self/cgroupAlternatively, from the server, read it from the session’s process, replacing <pid> with the session process ID:
Terminal
cat /proc/<pid>/cgroupThe output has the form 0::/<cgroup-path>, and the session’s cgroup directory is that path under /sys/fs/cgroup. For example, if the output is:
0::/user.slice/user-1000.slice/session-42.scopethen the cgroup directory is /sys/fs/cgroup/user.slice/user-1000.slice/session-42.scope. Use this directory in the verification commands below, substituting it for <cgroup-path>.
When sessions are managed by pam_systemd (see Step 2), the cgroup is shared across all of a user’s sessions on the node, so the values below reflect that user’s sessions collectively rather than a single session.
Verify CPU limits
Inspect the cpu.max file in the session’s cgroup directory (see Find the session’s cgroup path):
Terminal
cat /sys/fs/cgroup/<cgroup-path>/cpu.maxFor a 1-CPU limit, the expected output is the following:
100000 100000The first value is the allowed CPU time (in microseconds) per scheduling period (the second value). Equal values mean the session can use at most 100% of one CPU core. A 2-CPU limit produces 200000 100000.
If the output is max 100000, the system does not enforce a limit. Review Step 1 to confirm you correctly configured cgroups v2 with CPU enforcement.
Verify memory limits
Inspect the memory.max file in the session’s cgroup directory (see Find the session’s cgroup path):
Terminal
cat /sys/fs/cgroup/<cgroup-path>/memory.maxFor a 4 GB limit, the expected output is the following:
4294967296This value is the maximum memory (in bytes) the session’s cgroup can use. Once usage reaches this limit, the kernel’s memory cgroup out-of-memory (OOM) killer terminates processes within the cgroup to bring usage back down.
If the output is max, the system does not enforce a limit. Review Step 1 to confirm you correctly configured cgroups v2 with memory enforcement.