AWS (IAM Roles)
The AWS integration allows content running on Posit Connect to assume an AWS Identity and Access Management (IAM) role and receive temporary AWS credentials. Unlike most integrations, it does not deliver an OAuth access token: it delivers an access key ID, secret access key, session token, and expiration produced by the AWS Security Token Service (STS).
| Component part | Value |
|---|---|
| Provider registration | An IAM OpenID Connect (OIDC) identity provider and an IAM role. For the Viewer authentication type, also an OIDC application in an external identity provider; otherwise Connect acts as the identity provider. |
| Authentication types | Viewer, Service Account, Workload Identity |
| Configuration | All types: auth_type, role_arn. Viewer and Service Account: sts_region, session_duration. Workload Identity: region. Viewer also: auth_mode, client_id, client_secret (sensitive), authorization_uri, token_uri, scopes, token_endpoint_auth_method, use_pkce |
| Credential delivery | AWS STS credentials |
| Content compatibility | Viewer: interactive only. Service Account and Workload Identity: interactive and rendered. |
All three authentication types are built on the same AWS API call, AssumeRoleWithWebIdentity. What differs is who issues the OIDC token, who calls STS, and whose identity the resulting role session represents. The Credential delivery page documents each mechanism step by step. This page covers the configuration each one requires.
Provider registration
Performed by an AWS administrator. The Viewer authentication type also requires an identity provider administrator.
Setting up an identity provider
Viewer integration
To enable Viewer authentication type AWS integrations, perform the following steps to setup an external identity provider:
- In your identity provider’s administrator console, create a new OIDC application (sometimes called a “client”)
- Configure the application (varies across identity providers):
- Select “Authorization Code” as the OAuth 2.0 grant type
- Configure the redirect URL (callback URL):
https://connect.example.org/__oauth__/integrations/callback(Replaceconnect.example.orgwith the address of the Connect server)- The administrator must configure a
redirect_urifor the OIDC application. This is what allows Connect to obtain temporary access tokens, ID tokens, and refresh tokens.
- The administrator must configure a
- Enable PKCE (Proof Key for Code Exchange) support
- Add the required OIDC scopes:
openid(mandatory for OIDC)offline_access(for refresh tokens)
- Set the client type as “Confidential” if you want to use a client secret
- Ensure the provider supports the standard OIDC claims in the ID token:
sub(subject identifier)iss(issuer)aud(audience)
- Note the following OIDC endpoints and credentials:
- Client ID
- Client Secret
- Authorization Endpoint URI
- Token Endpoint URI
- OIDC issuer URL
- Some common examples of OIDC issuer URLs include:
- Entra:
https://login.microsoftonline.com/<tenant-id>/oauth2/v2.0 - Okta:
https://<org-id>.okta.com/oauth2/defaultorhttps://<org-id>.okta.com
Service account integration
For this integration authentication type, Connect acts as the identity provider by signing content session tokens with RSA keys managed by Connect itself. This process allows Connect to use workload identity federation to integrate with AWS.
AWS requires that identity providers are OIDC-compliant. To meet this requirement, Connect exposes the following public endpoints:
https://<connect-server-address>/.well-known/openid-configuration- Provides metadata necessary for OIDC discovery
https://<connect-server-address>/openid/v1/jwks- Provides list of public keys that can be used by external systems like AWS to validate content session tokens
Please note that this means that these routes needs to be made accessible to the AWS STS service in order to exchange credentials. Work with your network administrator to configure Connect properly for this use case.
Content session tokens are generated and injected into content when it starts up, so there are no extra steps to make this token available to publishers. For long-running content, Connect periodically refreshes the content session token and writes it to a file in the job directory. The Applications.ContentSessionTokenRefreshInterval configuration setting controls the refresh interval.
Note the following OIDC information managed by Connect:
- OIDC issuer URL
- The value of
IdentityProvider.Issuerif configured, otherwisehttps://<connect-server-address>/
- The value of
- Client ID or Audience
connect-content
Setting up AWS IAM
Next, your AWS administrator needs to configure both an AWS IAM Identity Provider and Role. Using the OIDC information from either the Viewer or Service Account identity provider setup above, follow these steps to properly configure AWS.
- Add the Identity Provider (IdP) in AWS:
- In AWS IAM console, go to “Identity providers”
- Choose “Add provider” and select “OpenID Connect”
- Enter your Identity Provider’s OIDC issuer URL
- Enter your application’s client ID as the audience
- Click “Add provider”
- Create an IAM Role for OIDC:
- In IAM console, create a new role
- Choose “Web identity” as the trusted entity type
- Select your newly created IdP
- Configure the audience value to match your client ID
- Add the required AWS permissions to the role
- Note the Role Amazon Resource Name (ARN) for later configuration
- Configure trust relationship:
- Edit the role’s trust relationship
- If applicable, ensure the trust policy includes conditions to validate OIDC claims. Note that there are constraints on which claims are supported. These claims can be configured in the external IdP for Viewer integrations. For Service Account integrations, the Connect-issued OIDC token has both the
audandsubclaims that are supported by AWS IAM trust policy conditions.
{
  "Version": "2012-10-17",
  "Statement": [
    {
      "Effect": "Allow",
      "Principal": {
        "Federated": "arn:aws:iam::12345:oidc-provider/login.microsoftonline.com/<tenant-id>/v2.0"
      },
      "Action": "sts:AssumeRoleWithWebIdentity",
      "Condition": {
        "StringEquals": {
          "login.microsoftonline.com/<tenant-id>/v2.0:aud": "<client-id>"
        }
      }
    }
  ]
}- Note the Role ARN, STS region, and configured maximum session duration as needed in the role settings.
For OAuth application administrators who prefer to use the same OAuth application for both Posit Connect and Posit Workbench, simply register the Workbench redirect URL (https://workbench.example.org/oauth_redirect_callback) in addition to the Connect redirect URL.
Granting access to AWS Secrets Manager
Content can use an AWS integration to read secrets from AWS Secrets Manager. Connect does not need any additional configuration. The role’s permissions policy determines which secrets content can read.
Attach a permissions policy like the following to the role, replacing the placeholders with your values:
{
  "Version": "2012-10-17",
  "Statement": [
    {
      "Effect": "Allow",
      "Action": "secretsmanager:GetSecretValue",
      "Resource": "arn:aws:secretsmanager:<region>:<account-id>:secret:<secret-name-prefix>*"
    }
  ]
}
Scope the Resource to the specific secrets, or a shared name prefix such as connect/, that content needs. Avoid granting access to every secret in the account.
Secrets Manager appends six random characters to every secret name to form its ARN, such as connect/db-password-AbCdEf. A Resource that ends with the exact secret name does not match that ARN. AWS then denies the request with an AccessDeniedException error stating that no identity-based policy allows the secretsmanager:GetSecretValue action.
To grant access to a single secret, end the Resource with -??????, such as arn:aws:secretsmanager:<region>:<account-id>:secret:connect/db-password-??????. Each ? matches one of the six random characters. Because the pattern does not depend on those characters, you can grant access to a secret before you create it. Be aware that if you delete the secret and create a new one with the same name, the role can also read the new secret. To limit the role to one specific secret, use the full ARN of the secret, including its six characters, and update the policy if you recreate the secret.
To grant access to every secret whose name starts with a prefix, end the Resource with *, as in the policy above. This pattern also matches secrets that you create later with that prefix. See Example: Wildcards in the AWS documentation.
If a customer-managed AWS Key Management Service (KMS) key encrypts the secret, the role also needs permission to use that key. See Permissions for the KMS key in the AWS documentation.
Every piece of content associated with an integration can read every secret the role allows. To give different content access to different secrets, create a separate role and integration for each group of secrets. To control which publishers can associate each integration with their content, use access control lists.
Transfer information to Connect administrator
The administrator of the identity provider and AWS shares the following information with the Connect administrator:
| Field | Description |
|---|---|
client_id |
Unique identifier for the OIDC application. |
client_secret |
Secret identifier for the OIDC application. Not required for Public Viewer integrations. |
authorization_uri |
The URI for the authorization endpoint. Can also be obtained from the Authorization Server Metadata Endpoint. |
token_uri |
The Uniform Resource Identifier (URI) for the token endpoint. Can also be obtained from the Authorization Server Metadata Endpoint. |
token_endpoint_auth_method |
Determines how parameters are passed to the OIDC application. This is a property of the OIDC application itself. |
scopes |
The permissions requested by Connect. At minimum, this must include offline_access and openid in order to retrieve an ID and refresh token. |
role_arn |
The AWS IAM Role ARN that the integration will allow content to assume. |
sts_region |
The region used by the AWS Security Token Service to retrieve the temporary credentials. |
session_duration |
The duration that the credentials will be valid. The maximum duration is set in AWS IAM dashboard. It is recommended to set this value to that maximum. |
Authentication types
This integration supports the Viewer, Service Account, and Workload Identity authentication types. See the documentation on supported authentication types for general definitions, and the table below for what is specific to AWS.
| Authentication type | Identity in AWS | OIDC token issued by | AssumeRoleWithWebIdentity called by |
Secret stored in Connect |
|---|---|---|---|---|
| Viewer | The content viewer | The external identity provider | Connect | Client secret (Confidential mode) |
| Service Account | The content item | Connect | Connect | None |
| Workload Identity | The Connect server | Connect | The AWS SDK in the content process | None |
The role session name differs per authentication type, so AWS CloudTrail attribution does too. Viewer sessions carry the globally unique identifier (GUID) of the viewer, Service Account sessions the GUID of the content item, and Workload Identity sessions the Connect server.
Workload identity
The Workload Identity authentication type uses AWS Web Identity Federation. Connect writes a short-lived token to a file, and the AWS SDK assumes the configured IAM role automatically. Unlike the Viewer and Service Account types, Connect does not perform the role assumption itself, so no AWS credentials or client secret need to be stored in Connect.
Workload identity requires AWS to verify tokens issued by Connect. The Connect server must be reachable from AWS for this to work.
The AWS administrator configures the IAM OIDC identity provider and role trust policy as described in Setting up AWS IAM. The OIDC provider uses the Connect issuer URL, which is the value of IdentityProvider.Issuer if configured, otherwise the value of Server.Address with a trailing slash (e.g., https://connect.example.org/). Connect issues tokens with the sts.amazonaws.com audience and the connect subject, so the role trust policy must validate those claims:
{
  "Version": "2012-10-17",
  "Statement": [
    {
      "Effect": "Allow",
      "Principal": {
        "Federated": "arn:aws:iam::<account-id>:oidc-provider/connect.example.org"
      },
      "Action": "sts:AssumeRoleWithWebIdentity",
      "Condition": {
        "StringEquals": {
          "connect.example.org:aud": "sts.amazonaws.com",
          "connect.example.org:sub": "connect"
        }
      }
    }
  ]
}
The Connect administrator supplies the IAM role ARN and the AWS region where the role is assumed.
Connect configuration
Performed by a Connect administrator.
Create the integration in Connect
Using the information from the AWS administrator, the Posit Connect administrator creates an integration through the dashboard’s System > Integrations settings. Once the integration has been created in Connect, it is available for use by all publishers. See Access control lists for information on customizing access to specific users or groups.
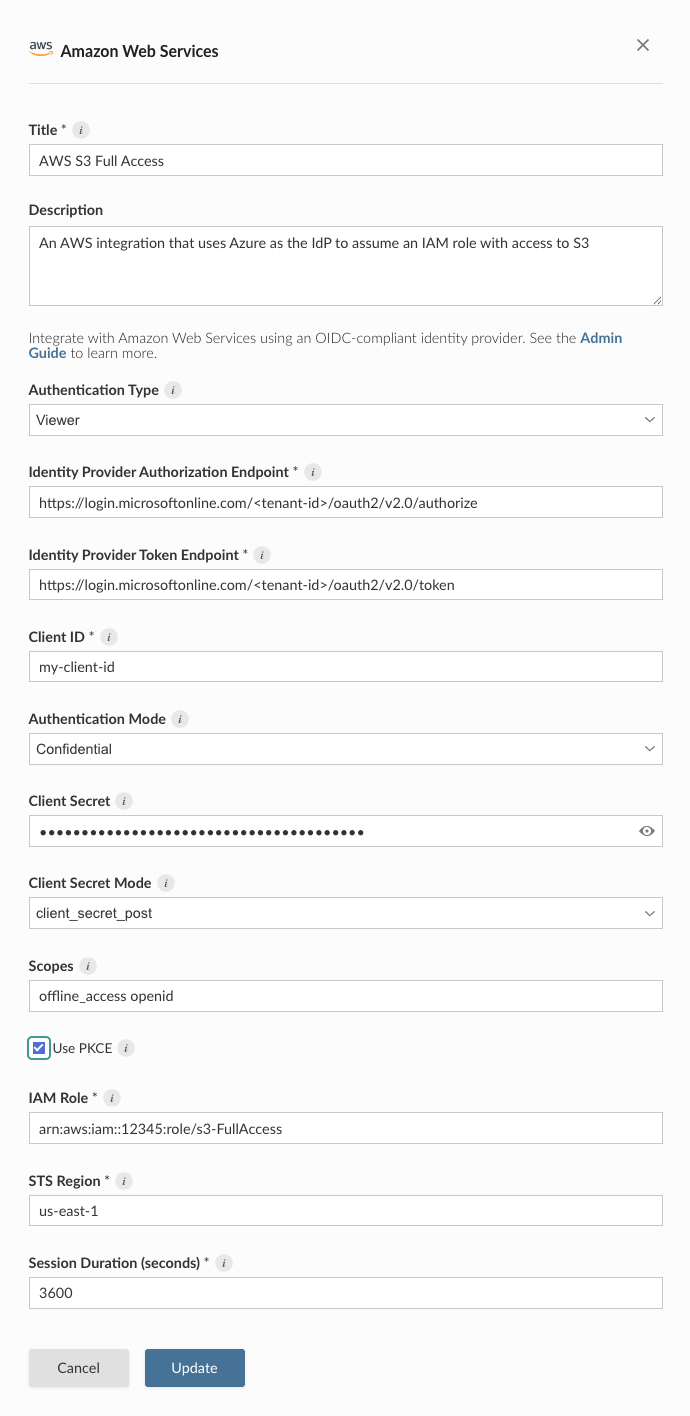
Alternatively, the example below shows how to create a Confidential AWS integration using curl and the Connect Server API. Replace connect.example.org with the address of the Connect server.
Terminal
curl -H "Authorization: Key ${CONNECT_API_KEY}" \
  -XPOST https://connect.example.org/__api__/v1/oauth/integrations \
  --data '{
    "template": "aws",
    "name": "AWS integration",
    "description": "A helpful description for publishers to use when choosing an integration for their content.",
    "config": {
      "auth_type": "Viewer",
      "auth_mode": "Confidential",
      "client_id": "<client-id>",
      "client_secret": "<client-secret>",
      "authorization_uri": "<authorization-endpoint>",
      "token_uri": "<token-endpoint>",
      "scopes": "offline_access openid profile email",
      "role_arn": "<role-arn>",
      "sts_region": "us-east-1",
      "session_duration": "3600",
    }
  }'
# 200 OK
# {"guid": "<oauth-integration-guid>", ... }OAuth/OIDC integrations in Connect use the PKCE (Proof Key for Code Exchange) extension for the authorization code flow by default. PKCE is required in the upcoming OAuth 2.1 specification, and is recommended in all cases to protect against authorization code injection attacks. If necessary, PKCE can be disabled by creating an AWS Viewer integration with "use_pkce": false in the config map, but this is not recommended.
Create a workload identity integration
Select the Workload Identity authentication type in the AWS integration form, providing the IAM role ARN and region. The example below shows the equivalent request using curl and the Connect Server API.
Terminal
curl -H "Authorization: Key ${CONNECT_API_KEY}" \
  -XPOST https://connect.example.org/__api__/v1/oauth/integrations \
  --data '{
    "template": "aws",
    "name": "AWS Workload Identity",
    "description": "AWS workload identity integration for non-interactive content.",
    "config": {
      "auth_type": "Workload Identity",
      "role_arn": "<role-arn>",
      "region": "us-east-1"
    }
  }'
# 200 OK
# {"guid": "<oauth-integration-guid>", ... }
Credential delivery
Content receives temporary AWS credentials rather than an OAuth access token. The mechanism depends on the authentication type:
- Viewer and Service Account: Content requests credentials from the Connect credential exchange endpoint using the
urn:ietf:params:aws:token-type:credentialsrequested token type. Connect performs the STS role assumption and returns the credentials, base64-encoded and serialized. - Workload Identity: Connect writes an OIDC token to a file and sets
AWS_ROLE_ARN,AWS_DEFAULT_REGION,AWS_STS_REGIONAL_ENDPOINTS, andAWS_WEB_IDENTITY_TOKEN_FILEin the content environment. It refreshes the token file for the life of the process. The AWS SDK does the rest with no code changes.
Credentials are valid for session_duration seconds, bounded by the maximum session duration of the IAM role, and default to one hour. Connect does not cache them: each exchange performs a fresh STS call, so content can request credentials again as expiry approaches. Content must handle expiration, because credentials are not renewed in place.
The OIDC tokens used in the exchange are never exposed to content. See AWS STS credentials for the full mechanism, including what is recorded and what is not.
Publisher usage
Before an integration works in content, a publisher must associate it with that content. See Adding integrations to deployed content in the Connect User Guide for the steps. A publisher can also request the association from manifest.json. See Automatically associating integrations.
Once the integration is configured, publishers can use it in their content. See the following cookbook recipes and how-to guides for examples:
Viewer integrations:
Service account integrations:
Workload identity integrations:
Workload Identity integrations work with AWS SDKs out of the box and require no code changes to authenticate correctly.
AWS Secrets Manager: