Branding and Experience Customizations
Overview
The default Posit Connect product branding and user experience can be customized, letting organizations align Posit Connect to their branding strategy.
Branding configuration settings
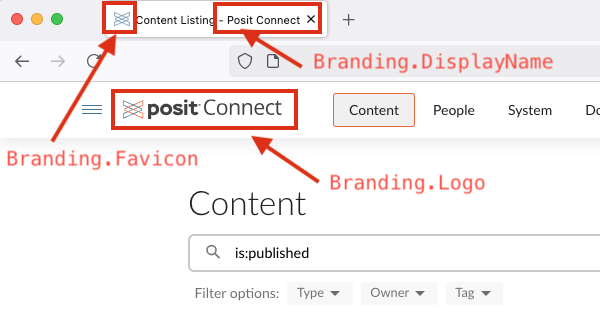
The Branding section of the configuration file allows you to remove elements of the Posit brand from Connect and replace it with your own. These settings include the ability to change the logo, favicon, and display name used throughout the platform.
Branding.Enabled(Default: disabled) When enabled, Posit Connect makes use of anyBrandingsettings and display “Powered by Posit Connect” when applicable.Branding.Logo(Default: none) Specify an image file path to use as the logo.Branding.Favicon(Default: none) Specify an image file path to use as the favicon.Branding.DisplayName(Default: “Posit Connect”) Provide a name to be used in place of “Posit Connect” in product messages and emails. This does not extend to the removal of Posit copyright information throughout the product.
A Branding configuration example might look like this:
/etc/rstudio-connect/rstudio-connect.gcfg
[Branding]
Enabled = true
Logo = /path/to/logo.png
Favicon = /path/to/favicon.ico
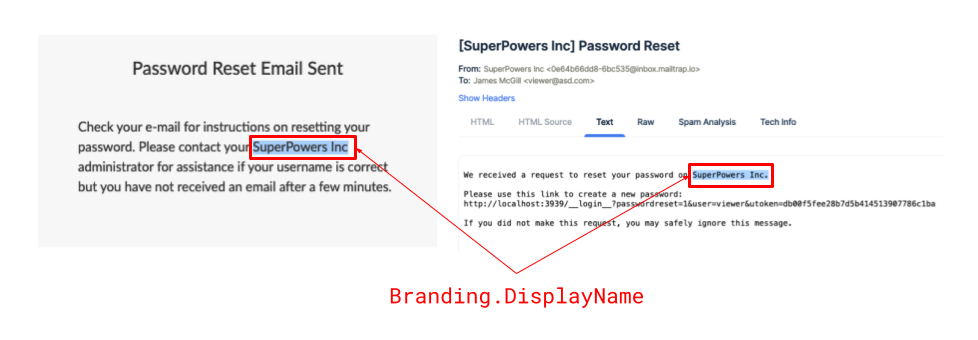
DisplayName = "SuperPowers Inc."
An example of how the DisplayName is used across product messages and emails can be seen in the password reset request workflow shown here:
The DisplayName customization is also used in product dialog messages such as on log in, user role upgrade requests, content permission requests, publishing content with Git, jump start publishing instructions, content configuration settings labels, and more.
Server configuration settings
The Server section of the configuration file provides settings for things such as: custom landing pages for logged-out and logged-in users, the ability to restrict components and functions from viewers, and email customization features. These settings can be added to your default Server configuration, as represented in the example found at the end of this section.
Custom landing pages
Logged-out users
Server.LandingDir (Default: none) Specifies an optional path from which a customized landing page is served to logged-out users. Learn more about how to customize the logged-out user landing page experience here.
Combine this feature with Branding.Enabled, Branding.Logo, and Branding.DisplayName to ensure that the navigation bar displays your own logo and users are prompted to log in to the platform name you’ve specified.
Logged-in users
Upon logging in, users are routed to the Posit Connect content dashboard. To specify an alternate landing page, RootRedirect can be used to divert users to a URL other than the standard Posit Connect dashboard.
One option for creating a custom landing page is to make a content showcase with the connectwidgets R package. connectwidgets can be used to query a Posit Connect server for your existing content items, then organize, subset, and style them with htmlwidgets components in an R Markdown document or Shiny application.
By default, connectwidgets provides links to content items that open in “Solo Mode”. This provides a level of separation between viewers and the content dashboard and management tools that are more relevant to publishers and administrators. Additional information can be found in the Posit Connect User Guide.
Once the RootRedirect URL is set, it will be important to notify publishers and other administrators about where they can access the content dashboard view of Posit Connect. This URL can also be customized with the DashboardPath setting.
Server.RootRedirect(Default: TheServer.Dashboardpath) The URL logged-in users will be redirected to when visiting the public URL used to access the server.Server.DashboardPath(Default: “/connect”) The URL path name to be used where the Connect dashboard is hosted.
When using connectwidgets content as a Server.RootRedirect, we recommend setting the content sharing setting to either All users - login required.
Viewer restrictions
If you plan to have viewers visit and interact with the content dashboard, there are a few Server settings configurations that can be used to restrict a user’s actions:
Server.HideViewerDocumentation(Default: disabled) When enabled, the Documentation menu item in the dashboard is hidden from viewers.
Additional viewer restrictions are available through Authorization settings described below.
Email customization
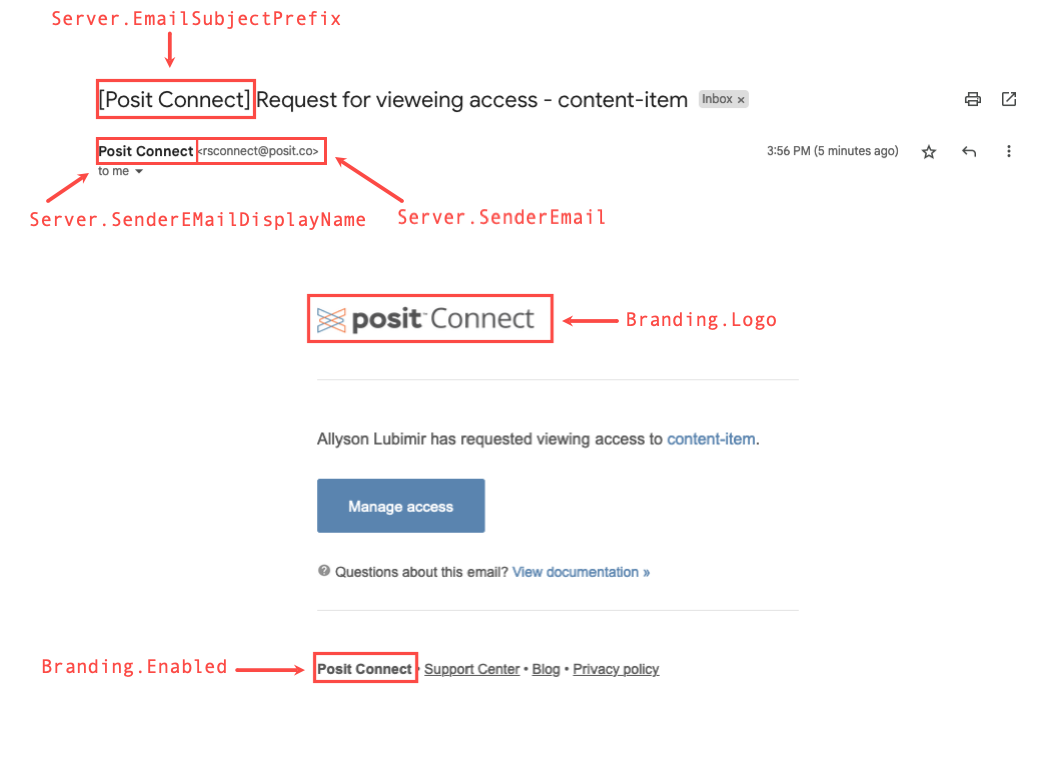
Server.EmailSubjectPrefix(Default: “[PositConnect]”) A leading subject prefix for all mail sent by Posit Connect.Server.SenderEmailDisplayName(Default: “Posit Connect”) The display name to use when sending outbound email.Server.EmailFromUserAddresses(Default: Disabled) Controls theFromandSenderemail message fields. When enabled, user email addresses are used as the From message field andServer.SenderEmailis the Sender field.
Some email providers do not support sending messages on behalf of other users. Server.EmailFromUserAddressses cannot be customized in that case.
This setting may require additional configuration steps from your email server administrator. An example configuration for using Google Workspace as the SMTP provider can be found here.
Combine these settings with Branding.Enabled, Branding.Logo, and Branding.DisplayName to ensure that system emails display your own logo and platform name:
Learn more about email customization options here.
Authentication notice customization
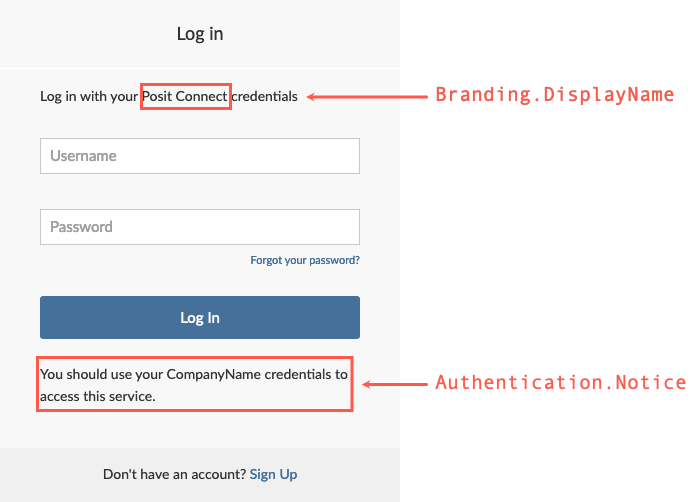
Branding.DisplayName(Default: “Posit Connect”) Name used in product messages and emails.Authentication.NoticeText of notice displayed to the user on the login, sign up, and user completion pages. This option is not applicable to Single Sign-On providers using SAML, OAuth2 (OpenID), or Proxied authentication.
Example server configuration
/etc/rstudio-connect/rstudio-connect.gcfg
[Server]
Address = https://super-powers.example.org/
RootRedirect = /landing-page
DashboardPath = /dashboard
LandingDir = /path/to/dir
EmailProvider = SMTP
SenderEmail = superpowers@example.org
EmailTo = no-reply@example.org
EmailSubjectPrefix = [Super Data Team]
SenderEmailDisplayName = "Super Data Team"
HideViewerDocumentation = true


