General Setup for Microsoft Azure
Configuring a Microsoft Azure integration in Posit Connect involves two main steps, each performed by different administrators.
- Step 1: An Azure administrator registers an application in Microsoft Entra ID.
- Step 2: A Posit Connect administrator creates an integration within Connect.
Step 1: Azure administrator
All integrations that use APIs from within Microsoft Azure must start with registering an application in Microsoft Entra ID. The application serves as the base all Azure integrations, with each unique integration simply requiring:
- The specific API permissions that need to be associated with the app registration.
- The corresponding scopes that are passed on to the Connect administrator.
This page will walk through the process of configuring an application in Microsoft Entra ID and provide a list of API permissions and their corresponding scopes for the Microsoft Azure integrations that Connect natively supports.
Create application in Microsoft Entra ID
Register application
The Azure administrator registers a new OAuth Application in Microsoft Entra ID. Application registration will have different requirements depending on the authentication type of the integration in Posit Connect:
Viewer Integration
The Azure administrator adds a redirect_uri for the OAuth application. Azure sends the user credentials to the redirect_uri at the end of the OAuth handshake, allowing Posit Connect to obtain a temporary access token and refresh token.
The OAuth application is configured with the following redirect URL (sometimes referred to as a callback URL): https://connect.example.org/__oauth__/integrations/callback. Replace connect.example.org with the address of the Connect server.
For OAuth application administrators who prefer to use the same OAuth application for both Posit Connect and Posit Workbench, simply register the Workbench redirect URL (https://workbench.example.org/oauth_redirect_callback) in addition to the Connect redirect URL.
Service Account Integration
Service account integrations do not direct the user through a login flow, so a redirect_uri is not required.
Setup client authentication
The Azure administrator decides whether this OAuth application requires client authentication. Client authentication requirements will differ depending on the authentication type of the integration in Posit Connect:
Viewer integration
Viewer integrations support both Public and Confidential OAuth applications. If unsure whether to create a Confidential or Public OAuth application, choose Confidential.
For Public OAuth applications, the Azure administrator enables the Allow public client flows option under Authentication > Advanced settings.
For Confidential OAuth applications, the Azure administrator adds a new client secret under the Certificates & secrets section.
Service account integration
Service Account integrations require a client secret, which represents the service account identity being used by the Connect Server. The Azure administrator adds a new secret under the Certificates & secrets section.
Workload identity integration
Workload identity is similar to using a service account, but avoids storing a long-lived secret in Connect. Microsoft recommends using workload identity federation when possible for enhanced security.
Workload identity requires Azure to verify tokens issued by Connect. The Connect server must be reachable from Azure for this to work.
Instead of generating a client secret, the Azure administrator configures a federated credential on the application registration with the following values:
| Field | Value |
|---|---|
| Federated credential scenario | Other issuer |
| Issuer | The value of IdentityProvider.Issuer if configured, otherwise the value of Server.Address with a trailing slash (e.g., https://connect.example.org/). |
| Explicit subject identifier | connect |
| Audience | api://AzureADTokenExchange (Azure’s default) |
The Azure administrator shares the application’s client ID (and tenant ID) with the Connect administrator.
Add API permissions
In the API permissions section, the Azure administrator adds the required permissions for the OAuth application. API permissions define the capabilities granted to the user when they request credentials from this OAuth application. These permissions are also referred to as scopes.
Connect provides native support for three specific Microsoft Azure integrations:
| Integration | API Permission |
|---|---|
| Azure OpenAI | Microsoft Cognitive Services/user_impersonation |
| Microsoft Graph | Microsoft Graph |
| SharePoint | SharePoint |
Connect additionally provides a general Azure integration template that can accommodate any collection of API permissions and scopes.
Transfer information to Connect administrator
The Azure administrator shares the following information with the Posit Connect administrator:
| Field | Description |
|---|---|
tenant_id |
The unique identifier of the organization in Azure (Microsoft Entra ID). |
client_id |
The unique identifier of the application in Azure (Microsoft Entra ID). |
client_secret |
The secret string configured under Certificates & secrets. Not required for Public Viewer or Workload Identity integrations. |
scopes |
Permissions supported by the OAuth application. Only include the scopes required by Connect. Not required for Workload Identity. |
Note, for the Azure OpenAI, Microsoft Graph, and SharePoint integrations the scopes field is automatically populated with sensible defaults within the template on the Connect side, but additional scopes can still be added if needed.
Step 2: Posit Connect administrator
After the Azure administrator completes the steps listed in the General setup guide, they pass the necessary information (tenant_id, client_id, client_secret, scopes, etc) to the Connect administrator who follows the instructions in this guide to complete the process of setting up an integration.
Create integration in Posit Connect
Using the information from the Azure administrator, the Posit Connect administrator creates an integration through the dashboard’s System > Integrations settings. Once the integration has been created in Connect, it is available for use by all publishers. See Access control lists for information on customizing access to specific users or groups.
Alternatively, the example below shows how to create a Confidential Viewer Azure integration using curl and the Connect Server API. Replace connect.example.org with the address of the Connect server.
Terminal
curl -H "Authorization: Key ${CONNECT_API_KEY}" \
  -XPOST https://connect.example.org/__api__/v1/oauth/integrations \
  --data '{
    "template": "azure",
    "name": "Azure integration",
    "description": "A helpful description for publishers to use when choosing an integration for their content.",
    "config": {
      "auth_type": "Viewer",
      "tenant_id": "<azure-tenant-id>",
      "client_id": "<azure-client-id>",
      "client_secret": "<azure-client-secret>",
      "scopes": "<desired_scopes> offline_access"
    }
  }'
# 200 OK
# {"guid": "<oauth-integration-guid>", ... }
To create a Workload Identity integration:
Terminal
curl -H "Authorization: Key ${CONNECT_API_KEY}" \
  -XPOST https://connect.example.org/__api__/v1/oauth/integrations \
  --data '{
    "template": "azure",
    "name": "Azure Workloads",
    "description": "Workload identity federation with Azure.",
    "config": {
      "auth_type": "Workload Identity",
      "tenant_id": "<azure-tenant-id>",
      "client_id": "<azure-client-id>"
    }
  }'
# 200 OK
# {"guid": "<oauth-integration-guid>", ... }
After the Azure administrator completes the steps listed in the General setup guide, they pass the necessary information (tenant_id, client_id, client_secret, scopes, etc) to the Connect administrator who follows the instructions in this guide to complete the process of setting up an integration.
Create integration in Posit Connect
Using the information from the Azure administrator, the Posit Connect administrator creates an integration through the dashboard’s System > Integrations settings. Once the integration has been created in Connect, it is available for use by all publishers. See Access control lists for information on customizing access to specific users or groups.
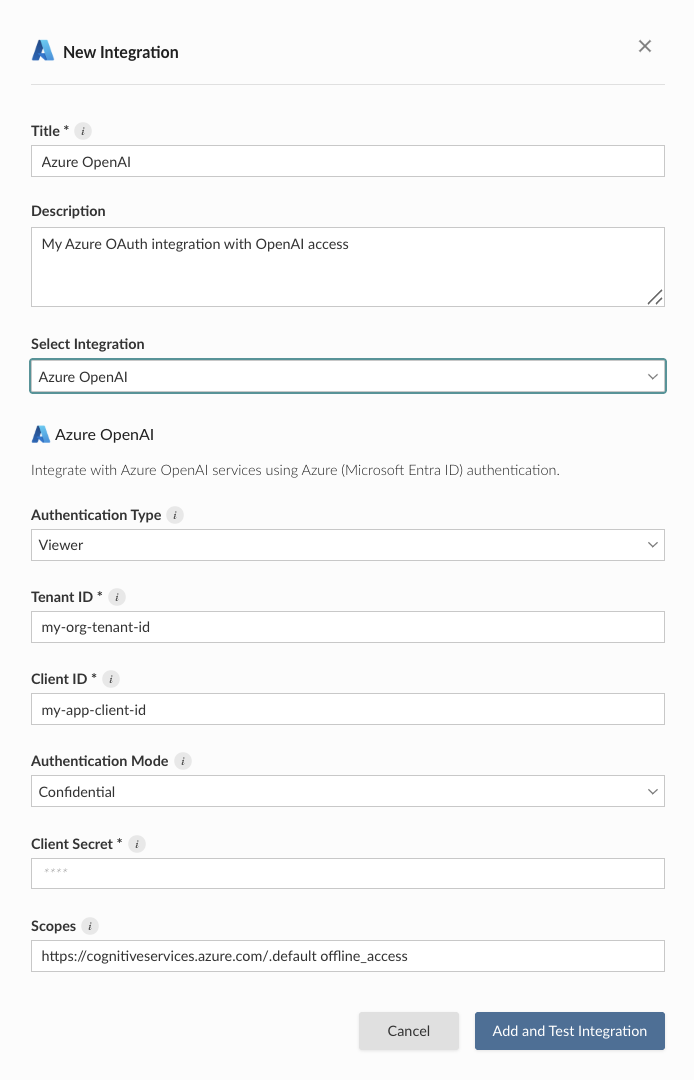
The OAuth scope https://cognitiveservices.azure.com/.default is a reference to the Microsoft Cognitive Services/user_impersonation permission that allows deployed content on Connect to access protected Azure OpenAI resources.
Alternatively, the example below shows how to create a Confidential Viewer Azure integration using curl and the Connect Server API. Replace connect.example.org with the address of the Connect server.
Terminal
curl -H "Authorization: Key ${CONNECT_API_KEY}" \
  -XPOST https://connect.example.org/__api__/v1/oauth/integrations \
  --data '{
    "template": "azure-openai",
    "name": "Azure OpenAI integration",
    "description": "A helpful description for publishers to use when choosing an integration for their content.",
    "config": {
      "auth_type": "Viewer",
      "tenant_id": "<azure-tenant-id>",
      "client_id": "<azure-client-id>",
      "client_secret": "<azure-client-secret>",
      "scopes": "https://cognitiveservices.azure.com/.default offline_access"
    }
  }'
# 200 OK
# {"guid": "<oauth-integration-guid>", ... }
After the Azure administrator completes the steps listed in the General setup guide, they pass the necessary information (tenant_id, client_id, client_secret, scopes, etc) to the Connect administrator who follows the instructions in this guide to complete the process of setting up an integration.
Create integration in Posit Connect
Using the information from the Azure administrator, the Posit Connect administrator creates an integration through the dashboard’s System > Integrations settings. Once the integration has been created in Connect, it is available for use by all publishers. See Access control lists for information on customizing access to specific users or groups.
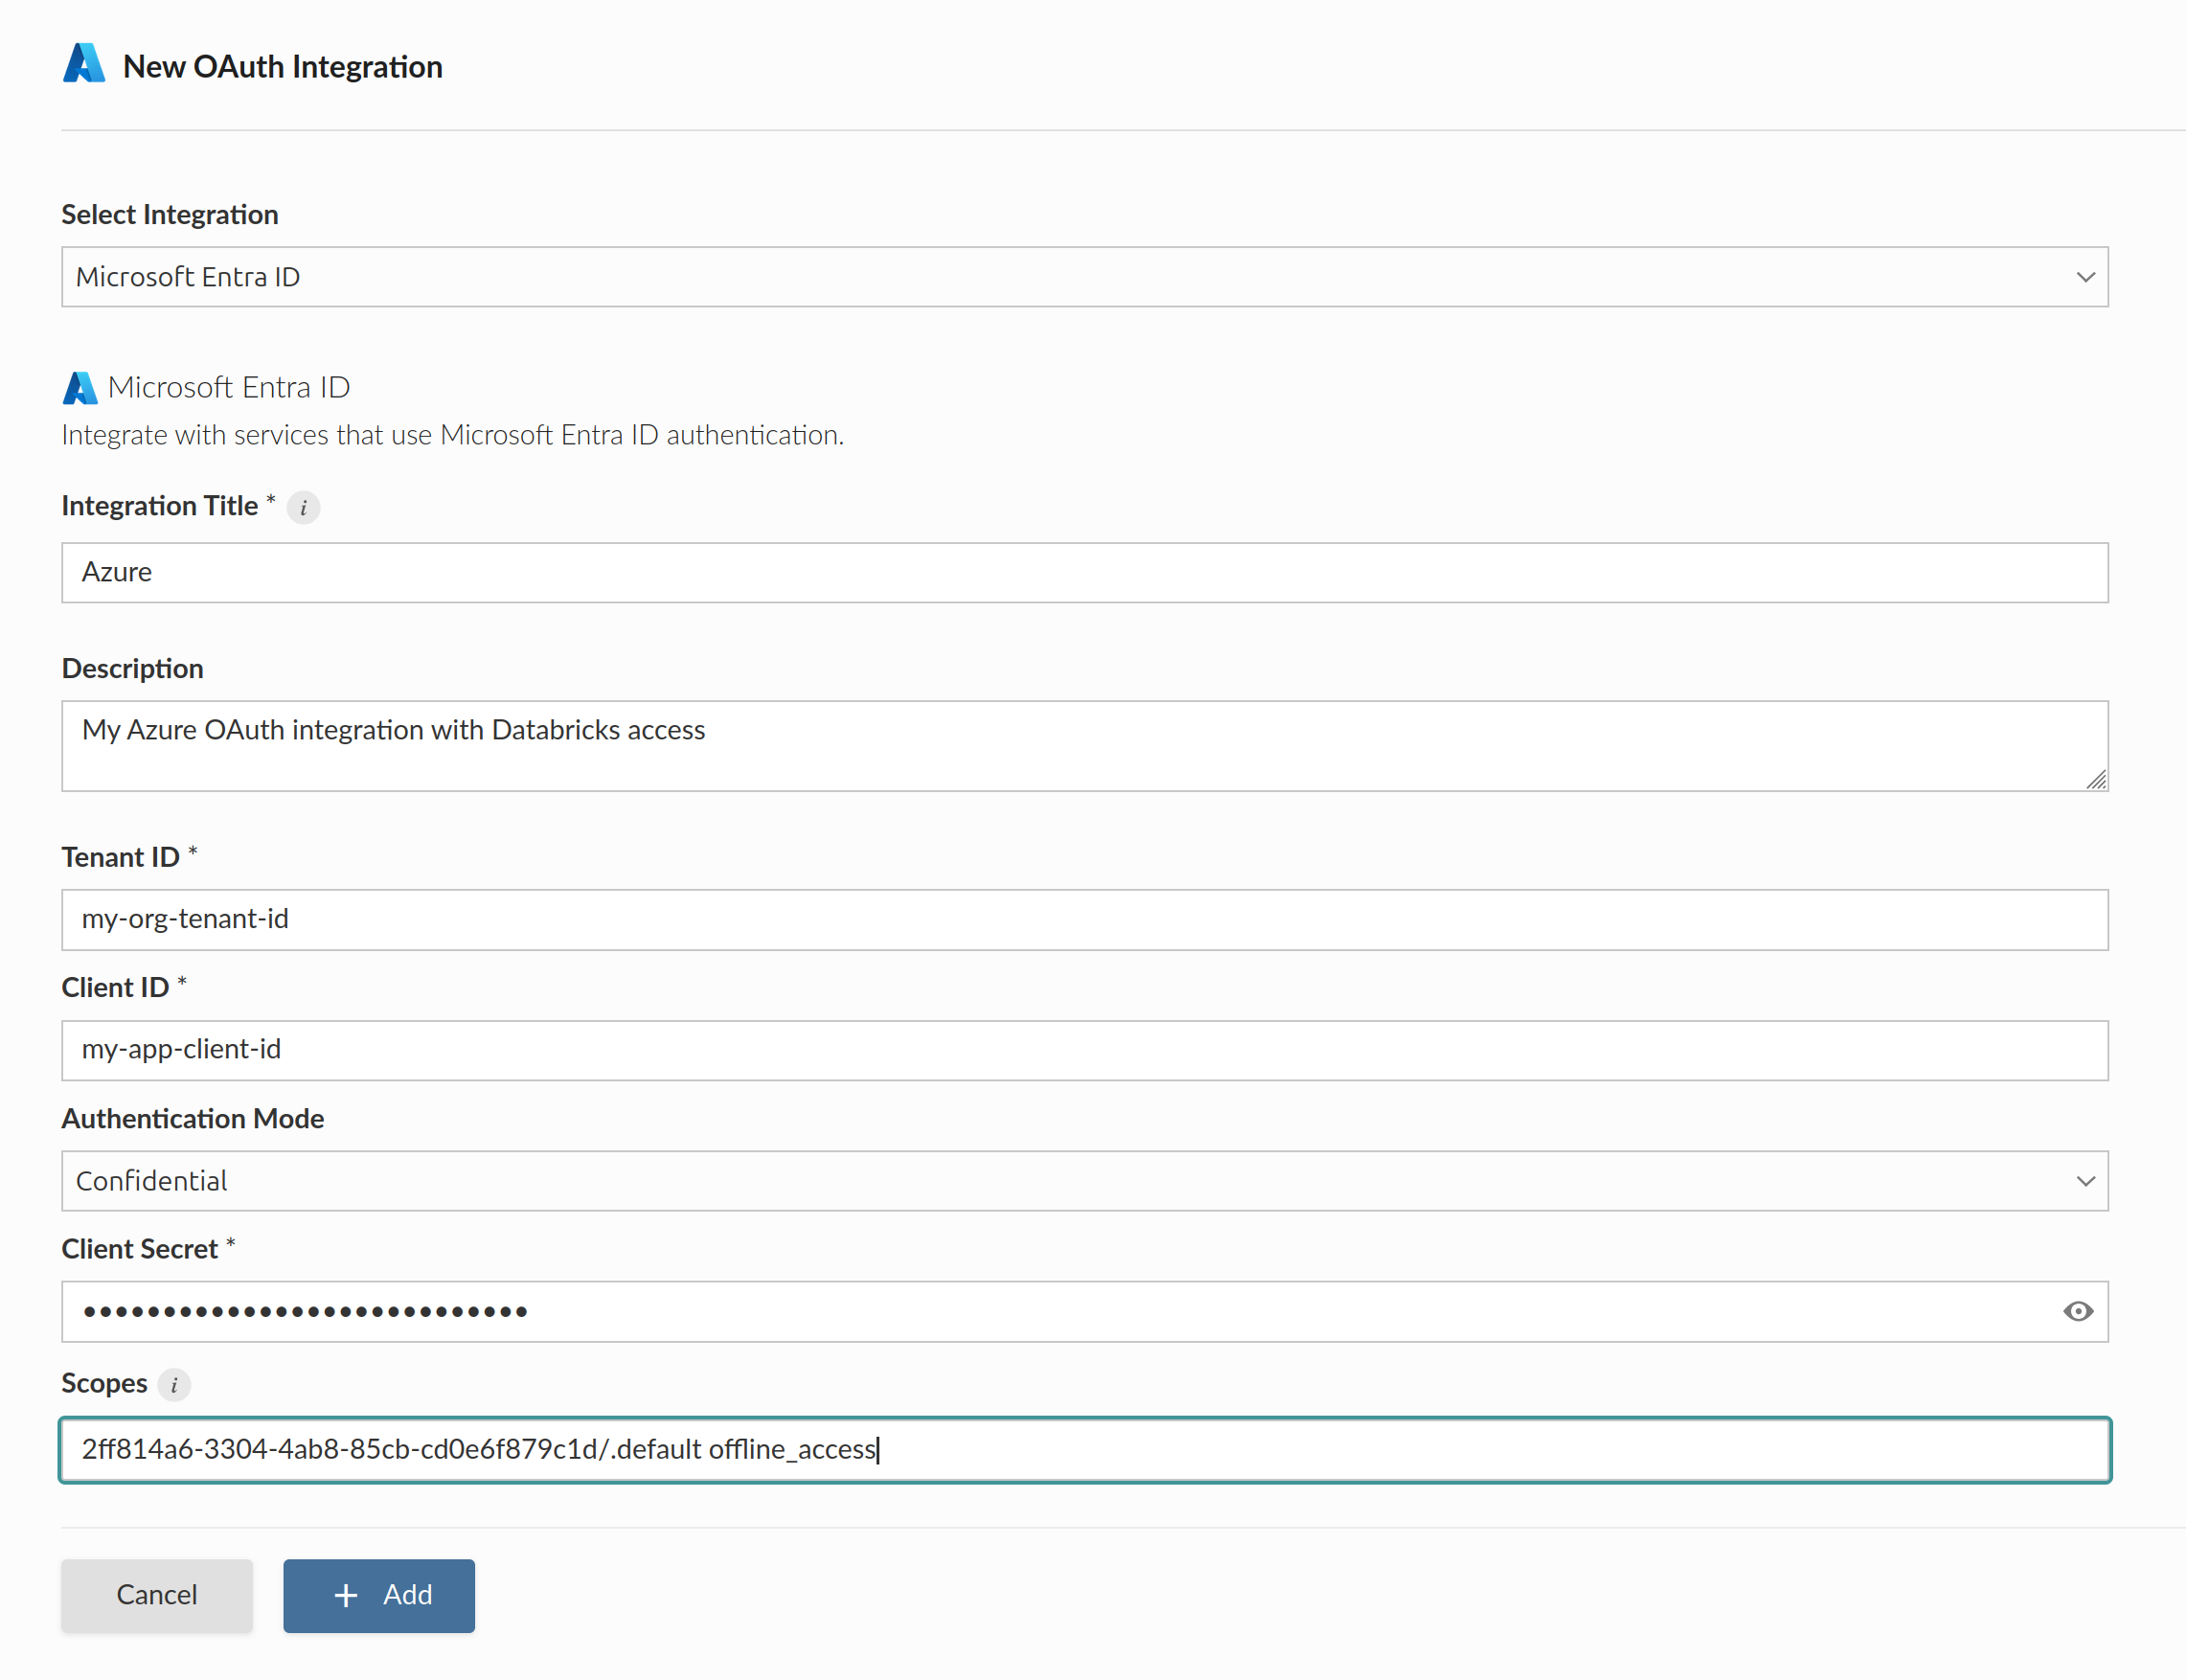
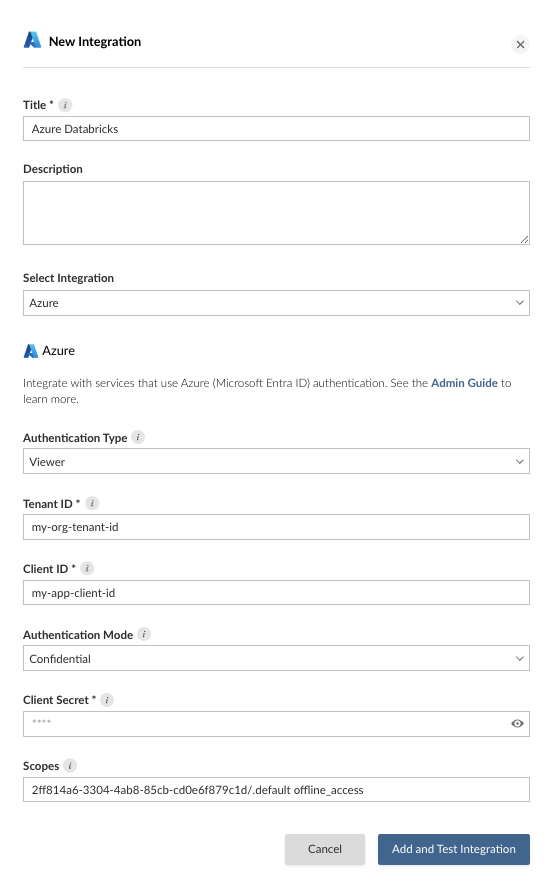
The AzureDatabricks/user_impersonation permission uses the scope value 2ff814a6-3304-4ab8-85cb-cd0e6f879c1d/.default. This scope allows Connect to access the viewer’s Databricks resources.
To configure an Azure Databricks integration, use the general Azure template with the value 2ff814a6-3304-4ab8-85cb-cd0e6f879c1d/.default in the scopes field.
Alternatively, the example below shows how to create a Confidential Viewer Azure Databricks integration using curl and the Connect Server API. Replace connect.example.org with the address of the Connect server.
Terminal
curl -H "Authorization: Key ${CONNECT_API_KEY}" \
  -XPOST https://connect.example.org/__api__/v1/oauth/integrations \
  --data '{
    "template": "azure",
    "name": "Azure Databricks integration",
    "description": "A helpful description for publishers to use when choosing an integration for their content.",
    "config": {
      "auth_type": "Viewer",
      "tenant_id": "<azure-tenant-id>",
      "client_id": "<azure-client-id>",
      "client_secret": "<azure-client-secret>",
      "scopes": "2ff814a6-3304-4ab8-85cb-cd0e6f879c1d/.default offline_access"
    }
  }'
# 200 OK
# {"guid": "<oauth-integration-guid>", ... }
After the Azure administrator completes the steps listed in the General setup guide, they pass the necessary information (tenant_id, client_id, client_secret, scopes, etc) to the Connect administrator who follows the instructions in this guide to complete the process of setting up an integration.
Create integration in Posit Connect
Using the information from the Azure administrator, the Posit Connect administrator creates an integration through the dashboard’s System > Integrations settings. Once the integration has been created in Connect, it is available for use by all publishers. See Access control lists for information on customizing access to specific users or groups.
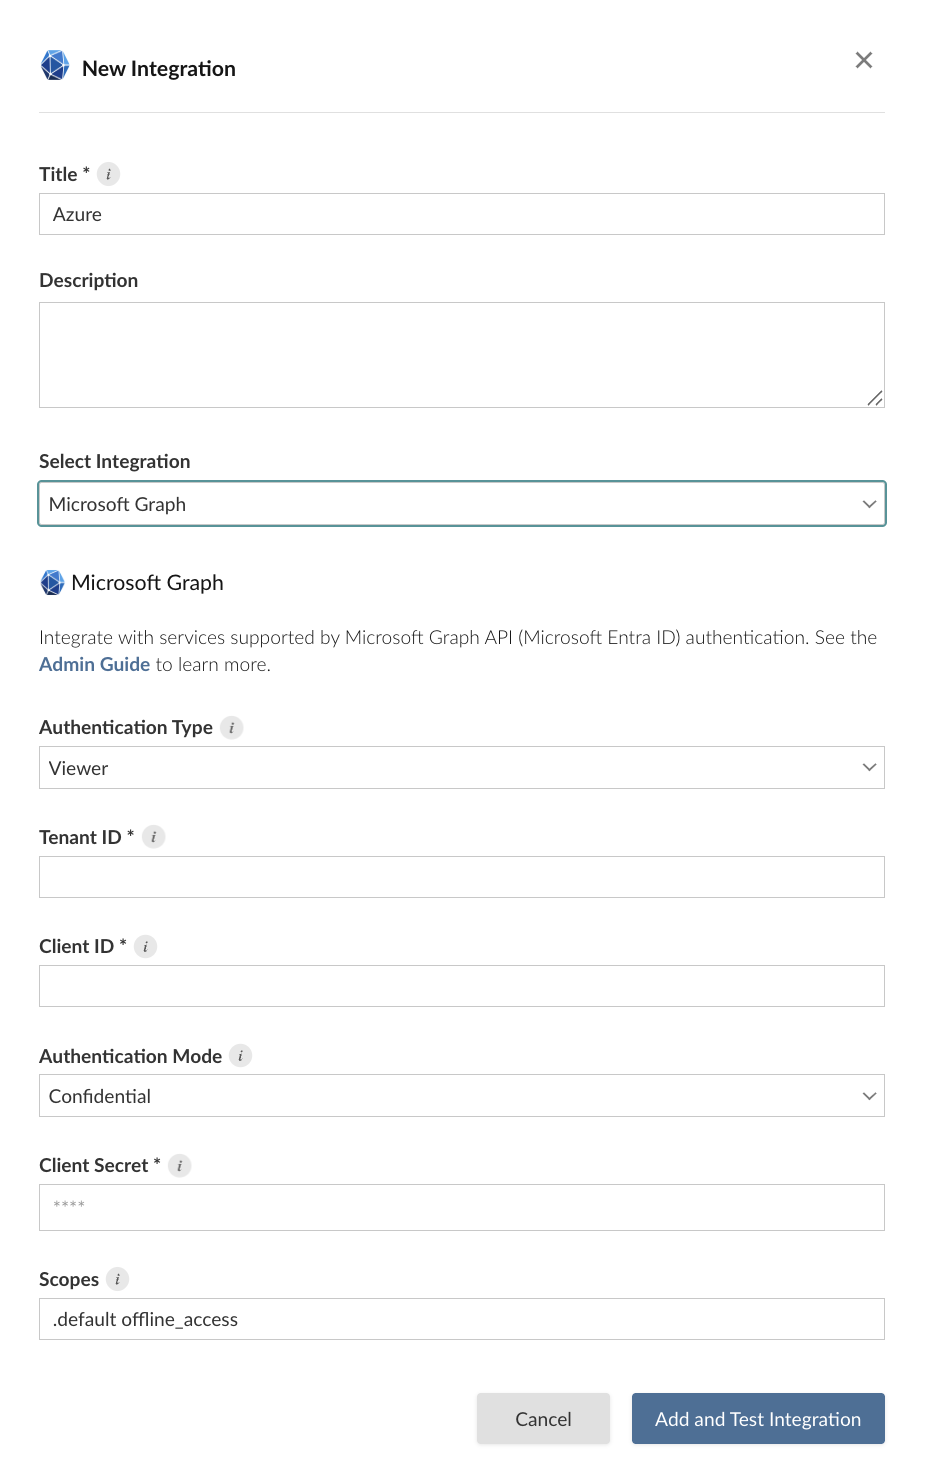
Alternatively, the example below shows how to create a Confidential Viewer Microsoft Graph integration using curl and the Connect Server API. Replace connect.example.org with the address of the Connect server.
Terminal
curl -H "Authorization: Key ${CONNECT_API_KEY}" \
  -XPOST https://connect.example.org/__api__/v1/oauth/integrations \
  --data '{
    "template": "msgraph",
    "name": "Microsoft Graph integration",
    "description": "A helpful description for publishers to use when choosing an integration for their content.",
    "config": {
      "auth_type": "Viewer",
      "tenant_id": "<azure-tenant-id>",
      "client_id": "<azure-client-id>",
      "client_secret": "<azure-client-secret>",
      "scopes": "https://graph.microsoft.com/.default offline_access"
    }
  }'
# 200 OK
# {"guid": "<oauth-integration-guid>", ... }
After the Azure administrator completes the steps listed in the General setup guide, they pass the necessary information (tenant_id, client_id, client_secret, scopes, etc) to the Connect administrator who follows the instructions in this guide to complete the process of setting up an integration.
Create integration in Posit Connect
Using the information from the Azure administrator, the Posit Connect administrator creates an integration through the dashboard’s System > Integrations settings. Once the integration has been created in Connect, it is available for use by all publishers. See Access control lists for information on customizing access to specific users or groups.

Alternatively, the example below shows how to create a Confidential Viewer SharePoint integration using curl and the Connect Server API. Replace connect.example.org with the address of the Connect server.
Terminal
curl -H "Authorization: Key ${CONNECT_API_KEY}" \
  -XPOST https://connect.example.org/__api__/v1/oauth/integrations \
  --data '{
    "template": "sharepoint",
    "name": "SharePoint integration",
    "description": "A helpful description for publishers to use when choosing an integration for their content.",
    "config": {
      "auth_type": "Viewer",
      "tenant_id": "<azure-tenant-id>",
      "client_id": "<azure-client-id>",
      "client_secret": "<azure-client-secret>",
      "scopes": "00000003-0000-0ff1-ce00-000000000000/.default offline_access"
    }
  }'
# 200 OK
# {"guid": "<oauth-integration-guid>", ... }
Next steps
Once the integration is configured, publishers can use it in their content. See the following cookbook recipes for examples:
Microsoft Graph:
SharePoint: