Post-Setup Tool Procedures
Following the initial configuration of Posit Connect using the Setup Tool, we recommend completing the following integration steps and verification tasks below.
User Management
We recommend this setting up an identity provider. Without setting up an identity provider, by default, the first user to log into Connect is assigned administrative privileges. Additional users default to the viewer role. For publishing privileges, users need to be promoted to the publisher role.
Learn more about user provisioning and management in the User Management section of this guide.
Data Sources
Posit provides licensed and high-quality commercial ODBC drivers for many common data sources from Magnitude Simba. We absorb the cost of this license and provide it to current paying customers, at no additional charge, to be used exclusively with Posit professional products.
We recommend this integration because:
- Posit Professional Drivers are ODBC data connectors for the most popular databases.
- It helps you develop and deploy applications and reports that depend on databases to Connect.
- It helps you use databases with R in a production environment.
Learn More about installing and configuring these drivers.
Verification Tasks
Test Email
You can view your current email settings from the Connect dashboard in the Admin > Settings panel.
To send a test email from this page and confirm that the email features work properly:
- From the Menu bar, click Admin.
- Click Mail Settings.
- Click Send Test Email.
- Wait a few moments, then verify that the test email was successfully delivered.
Test Publishing
This initial trial is a critical step to ensure Connect is ready for use.
There are two options to verify if your Connect server is ready for publishing:
Option 1: You can deploy example content without writing any code by using the Jump Start Examples that are presented upon logging into Connect and following the instuctions.
Option 2: If your environment is offline, you need to work with a publisher. Ask a publisher to:
Log into Connect. Once logged in, the Publish button displays on the main content page.
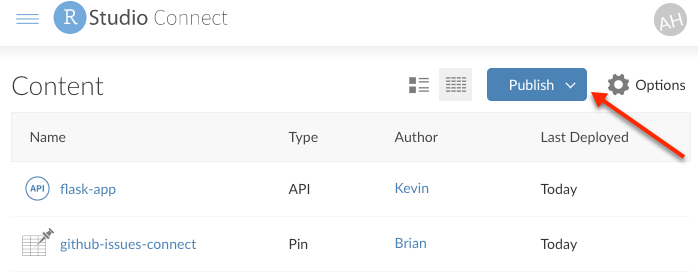
Click the Publish button.
Follow the instructions to publish a piece of their own content or one of the included samples.
NoteIf your publisher needs additional information for publishing a piece of content, please refer to the Publishing section of the User Guide, or our How-to Guides.
Run a Server Status Report
A Server Status Report tool is accessible to Administrators in the Connect dashboard under the Admin tab. This tool performs tests of the running Connect server and its process execution environments.
- Click the Run New Report button.
- If there are multiple active hosts registered, you can choose one or run a status report on all of them.
- Once all the checks have completed, review your report(s) by selecting from the report table.
A warning or failure in the Server Status Report does not mean your Connect installation is dysfunctional. Depending on your configuration settings, some status checks may fail by design. This report is an educational tool to be used for troubleshooting basic issues and is helpful to run before reaching out to RStudio Support.
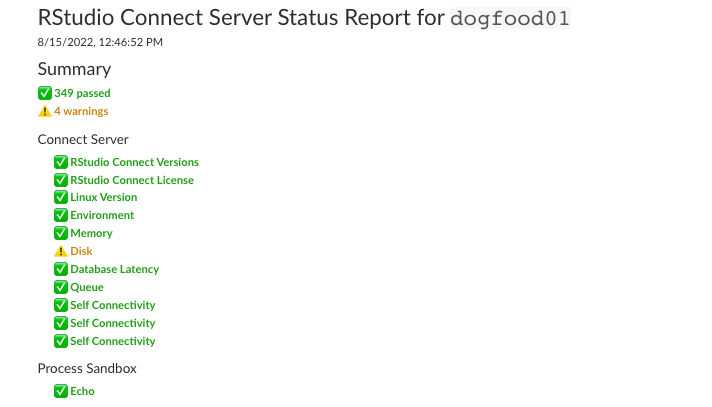
Server Status Reports can be configured to run periodically, refer to Server Status Report in the Troubleshooting section of this guide for instructions.
Additional configuration options
There are several additional configuration options available. The Initial Configuraton section provides an example of how you can manually edit the Connect configuration file to configure the public URL of your server. Or, more for information, see the Configuration appendix section.