Content Settings Panel
The Settings panel manages how content appears, who can access it, and how it runs on Posit Connect.
To open the Settings panel, click the Settings icon on the content header when viewing your content or the Settings icon on the Content List page. The panel has six tabs: General, Current Bundle, Access, Schedule, Usage, and Advanced. The available options under each tab depend on the content type, user role, and server configuration.

To hide the Settings panel when sharing content with others, use Standalone mode from the content header dropdown menu. Standalone mode displays only the content itself, removing navigation elements and the Settings panel. This is useful for embedding content in other applications or sharing a clean view with stakeholders.
Make content discoverable
Help others find content by adding a clear title, detailed description, custom thumbnail image and organizational tags.
Title, description, and thumbnail
Content owners, collaborators, and administrators can edit these fields on the General tab.
Upload a JPEG, PNG, GIF, or SVG image as the content thumbnail. Unlike the title or description, the thumbnail is only visible to users who can access the content. This prevents sensitive information in screenshots from being exposed to unauthorized users.
Content information
The Information section displays read-only metadata about the content, including when it was created and last deployed, its content type, GUID, and Python, R and Quarto versions. For off-host execution configurations, this section also shows details about the most recent execution environment.
Changing the content owner is not available through the dashboard. Administrators can transfer ownership using the Connect Server API for a recipe, or the usermanager utility to transfer all of a user’s content.
Locking content
Lock content to temporarily disable it while preserving all settings and data. Content can be locked from the Danger Zone section of the General tab. When locked:
- Processes are terminated and scheduled runs are paused
- New deployments and visits are blocked
- Content is hidden from search (use
is:lockedfilter to find it)
Add a custom message (supports Markdown) to explain why content is locked and suggest alternatives. When unlocking content, scheduled runs resume immediately based on their existing configuration. To lock content permanently, remove its scheduling configuration first.
Delete content
Content owners, collaborators, and Connect administrators can delete content from the Danger Zone section of the General tab.
Deleted content cannot be restored. If you are unsure whether content should be fully removed, locking content to disable it is also an option.
When content is deleted:
- All processes associated with the content are terminated
- Any scheduled runs associated with the content are removed
- All content bundles and rendered artifacts are permanently deleted from disk
View bundle information
A bundle is a versioned snapshot of your content, including all code files, configuration, and package dependencies. Each time you publish or update content, Connect creates a new bundle. The most recently activated bundle is the version that users see when they access your content. For more about managing bundles, see Content Bundles.
The Current Bundle tab shows details about the active bundle, including bundle metadata, package versions, logs, and, for git-backed content, repository information. Use this tab when troubleshooting deployment issues or verifying which version of the content is running. For git-backed content, you can also change the branch from the Git Details section without redeploying.
Content packages
View a list of package versions installed for a content item, including packages requested by the content, packages required by the Connect runtime, external packages included by the administrator, and all dependencies. This comprehensive list is available under the Python Packages or R Packages section. The list can also be retrieved via the Connect Server API—see the Cookbook for a recipe.
Environment management status
The Environment Management section shows whether Connect managed package installation for the current bundle. A status of “Enabled” means Connect used pip/venv (Python) or packrat (R) to install packages required by the content; “Disabled” means the administrator pre-installed packages; “Unknown” indicates not applicable for the current bundle.
To change this setting for future bundles, see the Environment management section in the Advanced tab.
Manage access
Customize the content URL for easy sharing, manage collaborators, control who can view your content and add integrations.
Custom content URL
Replace the default GUID-based URL with a memorable custom path (sometimes called a “vanity URL”) like /sales-dashboard/. Your custom path will be appended to the URL of your Posit Connect server to form a complete URL for this content. By default, publishers can manage custom URLs for their content; administrators can restrict this via Authorization.PublishersCanManageVanities.
Content URL restrictions
- Nesting: Vanity URLs cannot be nested (e.g., if
/finance/exists, you cannot create/finance/budget/). Siblings like/finance/and/marketing/are allowed - Case sensitivity: URL lookups are case-sensitive (
/MyApp/≠/myapp/), but conflict detection is case-insensitive (you cannot have both) - Characters: Only alphanumeric characters, hyphens, underscores, and slashes are allowed
- Reserved prefixes:
/__,/favicon.ico,/connect,/apps,/users,/groups,/setpassword,/user-completion,/confirm,/recent,/reports,/plots,/unpublished,/settings,/metrics,/tokens,/help,/login,/welcome,/register,/resetpassword,/content, and the custom dashboard path (Server.DashboardPath)
Sharing settings
By default, only the publisher can view new content. Other users on the Connect server cannot see the content unless content is shared with them.
There are several visibility options, arranged from most open to least:
- Anyone - no login required
- All users - login required
- Specific users or groups
The server configuration and license may restrict which options are available.
Selecting Specific users or groups allows choosing individual users or groups registered on the Connect server.
Public access content verification
To use the Anyone - no login required access type on interactive content (e.g., Shiny apps, FastAPI APIs), the server must have an Enhanced or Advanced license with the Public Access entitlement. If your license does not include this entitlement, the Anyone - no login required option is not available.
If your license includes the Public Access entitlement but is not Unrestricted, Public Access interactive content must be available on the public internet. Posit Connect automatically verifies the public accessibility of Public Access interactive content.
See Public Access for more information. Check with your server administrator if unsure what the license allows or requires.
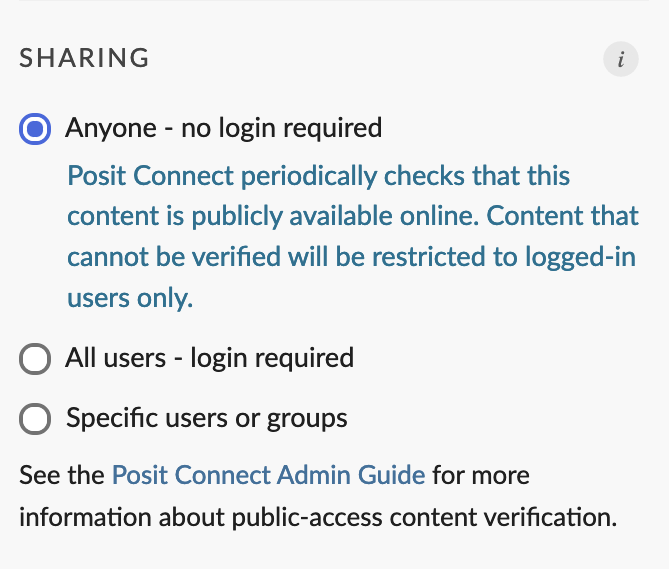
If your license allows Public Access and requires verification, and interactive content is configured to use the Anyone - no login required access type, additional information appears in the sharing settings area indicating the verification status of the content.
Content that is new, or recently verified to be publicly accessible, looks like this:
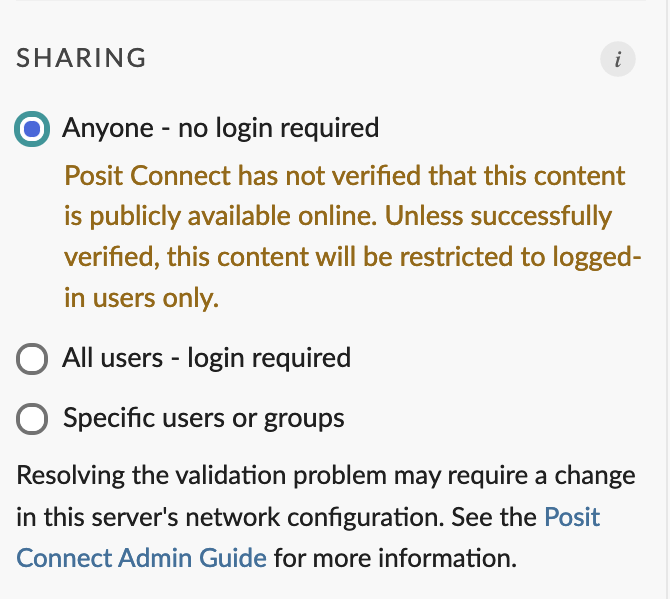
Posit Connect allows for occasional network failures or temporary configuration issues and does not display a warning if verification fails a few times. After an initial grace period, if Connect is unable to verify public access, a warning appears in the sharing settings:
If verification problems continue, access is restricted to All users - login required and anonymous access is prohibited:
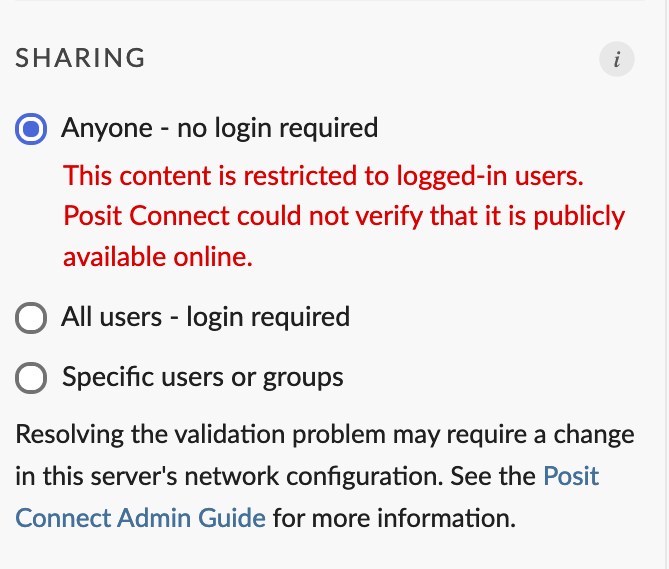
Public Access is restored once the content is available on the public internet and Posit Connect verifies its accessibility. Check with your server administrator if unsure whether your content is publicly accessible.
Click Test Now to manually trigger verification. A manual test provides a detailed error message, or immediately restores access if verification is successful. See Illustrated workflow and common issues for help interpreting errors and addressing common issues.
Viewers and collaborators
When sharing with specific users or groups, two levels of access are available:
- Viewer - Can view the content
- Collaborator - Can view, deploy new versions, modify settings, and manage access
By default, users are notified by email when granted access. Uncheck Notify people by email when added to grant access without notification. For best practices, see Publishing with Collaborators.
Integrations
Integrations allow content to securely access protected resources—whether from Connect itself or external services like Databricks, Snowflake, AWS, and Google Cloud. When associated with an integration, content can request credentials to authenticate without hardcoding secrets.
Use the Add Integrations button to associate content with available integrations configured by the administrator. For details on authoring content that uses integrations, see Integrations.
Click Email now to email information about the content to the selected recipients. The email also includes a link to view the content on Connect.
By default, email functionality is disabled until properly configured by the administrator. See the Admin Guide for setup instructions.
Schedule automatic updates
The Schedule tab is available for content types that can be rendered on a schedule. Configure automatic rendering for reports and documents here.
Failed renders notify the content owner and collaborators (unless disabled via Applications.NotificationsToOwnerOnly).
For full details on scheduling options and email configuration, see the Scheduling chapter.
Monitor content usage
View detailed analytics about who is accessing content and how often. The Usage tab provides charts and tables showing visit patterns, user activity, and session data to help understand content engagement.
The Usage tab displays data for content you own or collaborate on. Administrators can view usage data for all content on the server through the System page.
Tune performance and configure execution
Use the Advanced tab to configure environment variables, process scaling, timeouts, resource limits, and execution settings.
Process scaling and timeout settings only appear for interactive content (Shiny, Dash, Streamlit, APIs, etc.). Static content such as documents, reports, and HTML files shows limited settings, typically only environment variables and environment management.
Environment variables
Never place secrets (keys, tokens, passwords) in your code when developing for Connect. Protect sensitive information using environment variables or configuration packages like the config package.
Connect automatically provides a number of environment variables when running your content:
POSIT_PRODUCT is assigned the value CONNECT.
- The
POSIT_PRODUCTenvironment variable cannot be customized
RSTUDIO_PRODUCT is assigned the value CONNECT. Deprecated in favor of POSIT_PRODUCT.
- The
RSTUDIO_PRODUCTenvironment variable cannot be customized
CONNECT_SERVER contains the public URL of the Connect server. This URL was specified by the Server.Address server configuration setting.
- Content owners can overwrite this value in the Advanced tab or with the Posit Connect Server API
- The automatic addition of
CONNECT_SERVERcan be disabled for security reasons using theApplications.DefaultServerEnvserver configuration setting. Reach out to your Connect server administrator for additional details
CONNECT_API_KEY is owned by the content owner and is ephemeral (only exists for the duration of the underlying content process).
- Content owners can overwrite this value in the Advanced tab or with the Posit Connect Server API
- The automatic addition of
CONNECT_API_KEYcan be disabled for security reasons using theApplications.DefaultAPIKeyEnvserver configuration setting. Reach out to your Connect server administrator for additional details
CONNECT_CONTENT_GUID contains the GUID for the content.
- Content owners can overwrite this value in the Advanced tab or with the Posit Connect Server API
CONNECT_CONTENT_JOB_KEY contains the unique identifier for this execution of the content.
- Content owners can overwrite this value in the Advanced tab or with the Posit Connect Server API
R_CONFIG_ACTIVE identifies the active configuration for use with the config R package. The default value is rsconnect, but administrators can change this value globally with the R.ConfigActive server configuration setting.
- The
R_CONFIG_ACTIVEenvironment variable is automatically configured only for content using R - Content owners can overwrite the default value for
R_CONFIG_ACTIVEin the Advanced tab or with the Posit Connect Server API. Some installations might prohibit this adjustment
SPARK_CONNECT_USER_AGENT contains posit-connect/ and the Connect version.
- Content owners can overwrite this value in the Advanced tab or with the Posit Connect Server API
In addition to the automatically provided variables above, content owners can set the following variable to control runtime behavior:
LOG_LEVELcontrols the verbosity of application logs for Python content. Valid values areDEBUG,INFO,WARNING,ERROR, andCRITICAL. The default isINFO, which shows access logs (incoming requests and response status codes) and informational messages from the application framework (e.g., uvicorn, gunicorn, Bokeh, Panel, Streamlit, Voilà).Setting
LOG_LEVELtoWARNINGor higher suppresses access logs and routine informational messages. Setting it toDEBUGenables verbose debug output from the application framework.
Setting environment variables
Environment variables can be set prior to deploying a content bundle with the Posit Connect API. Follow the Deploying Content workflow in the Server Cookbook.
Alternatively, set environment variables on the Advanced tab. Once a variable is added, the value is obscured.
Environment variables are encrypted on-disk and in-memory. They are decrypted only when a process is about to be started.
When multiple sources define the same environment variable, the last value applied takes effect. Variables set through the Advanced tab override server-level defaults, but may themselves be overridden by a supervisor script or by R startup files (.Renviron). For the full order of precedence, see Environment variable precedence in the Admin Guide.
Process configurations
Control how many instances of content can run simultaneously. If content returns 503 errors or slow responses under load, adjust these settings.
Process settings:
| Setting | Description |
|---|---|
| Max processes | Maximum simultaneous processes per Connect node |
| Min processes | Minimum processes kept running |
| Max connections per process | Connections per process before routing to a new one |
| Load factor | How eagerly Connect spawns new processes (0 = aggressive, 1 = conservative) |
Max processes cannot be set to zero. If you want to prevent content from running, use content locking instead.
Common scenarios:
- High traffic / 503 errors - Increase Max processes (try 5-10) and Max connections per process (try 100)
- Slow application startup - Increase Min processes (try 1-2) to keep workers ready
- Memory-constrained server - Decrease Max processes to limit resource usage
- Low traffic applications - Keep defaults to conserve resources
Changes take effect immediately for new processes, but existing processes in use are not terminated until they finish serving connections.
Troubleshooting 503 errors or timeouts: If content returns HTTP 503 status codes or connection timeouts under load, try increasing Min processes (to keep workers ready), or increase Max processes and Max connections per process to handle more simultaneous requests.
See Scaling and Performance Tuning and the Admin Guide on process management for details.
Timeout configurations
Adjust timeouts if content takes a long time to start or users get disconnected during long operations. Connections to new processes use updated timeout values, while existing connections are not modified or disconnected.
- Initial timeout - Maximum number of seconds to wait for an app to start.
- Idle timeout - Minimum number of seconds a worker process will remain alive after it becomes idle - i.e. no active connections.
- Connection timeout - Maximum number of seconds allowed without data sent or received across a client connection. Connections reaching this idle threshold are closed. A value of 0 means connections will never time-out (not recommended).
- Read timeout - Maximum number of seconds allowed without data received from a client connection. A value of 0 means a lack of browser interaction will never cause the connection to close. This is useful when deploying dashboard applications which send regular updates but have no need for interactivity.
Environment management
Control whether Connect installs packages automatically for future deployments, or relies on pre-installed packages. This setting affects new bundles when you publish updates. To see what was used for the current bundle, check the Environment Management status in the Current Bundle tab.
Options:
- Enabled - Connect manages package installation
- Disabled - Administrator pre-installs packages in the runtime environment
- Use server default - Defaults to the server configured environment management strategy
Bundle-specified strategies take precedence over this setting. See the Admin Guide for Python and R environment management details.
Process execution
Control which Unix user account runs the content. The process owner determines file and resource access on the server.
By default, process execution features are only available to administrators. To enable process execution features for publishers, see the Connect System Configuration documentation.
Changing the process execution to current user requires additional setup. See the Connect Nameservice installation and configuration documentation for more details.
Changing the process owner
The following options are available to change the process owner for when the content is run on the server:
- Default user - Runs as the server-configured default
- Alternate user - Specify a Unix username
- Current user - Runs as the logged-in user (with configurable fallback for anonymous access)
What happens next:
- Content will restart automatically with the new process owner
- All future executions will run under the specified Unix user account or as the logged-in user when accessed by authenticated users
- Content runs as the fallback user when accessed anonymously
- The process will have access to files and resources based on that user’s permissions
Troubleshooting:
If the specified Unix username does not exist, the Connect UI will show a warning message. Contact your system administrator if you believe this is an error.
Per-content job metrics
When viewing logs for a job, you can also view resource metrics, including CPU usage, memory consumption, and connection counts. These metrics are displayed as charts alongside the log output, helping you understand the resource usage patterns of your content.
By default, job metrics are only collected when they are enabled for the content item. To enable metrics collection:
- Open the Settings panel for the content you want to configure.
- Navigate to the Advanced tab.
- In the Resource Metrics section, set the value to enabled.
- Click Save to apply your changes.
- Your app will reload and you can see metrics in the Logs panel.
However, this default can be changed to collect metrics for all jobs by default using the Applications.MetricsCollectionEnabled configuration setting.
Off-host execution settings
These settings apply only to Connect installations using off-host execution with Kubernetes.
Service accounts
Administrators can assign a Kubernetes service account to content. The dropdown shows accounts available at Connect startup.
The list of available Kubernetes service accounts is populated during Connect startup. If the actual service accounts in Kubernetes have changed, the list may be out of sync. This can cause content to fail with a “service account not found” error, or prevent valid service accounts from appearing. If an account shows (not recognized), ask the administrator to restart Connect to refresh the list.
See the Admin Guide on service accounts for configuration details.
Execution environment
Specify a container image for content that needs specific system libraries or language versions. By default, Connect selects the most appropriate environment automatically. Publishers can select execution environments when Applications.DefaultEnvironmentSelectionEnabled is enabled (the default); otherwise only administrators can configure this setting. See the Admin Guide on execution environments for details on available images and customization options.
CPU & RAM
Set resource requests and limits for content. Processes exceeding RAM limits are terminated; processes exceeding CPU limits are throttled.
- Initial CPUs/RAM - Minimum resources requested (used for Kubernetes scheduling)
- Max CPUs/RAM - Resource limits (0 = unlimited, if allowed by administrator)
The administrator may set defaults or upper bounds for these values. These limits apply to all processes involved in rendering or executing content, including prerenders for interactive content with prerendered components.
Troubleshooting failures: Processes exceeding RAM limits are terminated by the operating system, often with ambiguous error messages. If content fails to render or execute and the cause is unclear, try increasing or removing RAM limits. Similarly, CPU or RAM requests that Kubernetes cannot fulfill may cause errors in Kubernetes logs but not Connect logs—try reducing initial resource requests if content fails to start.
GPU
Request AMD or NVIDIA GPUs for ML inference or GPU-accelerated workloads. GPU options only appear if the administrator has enabled them via Scheduler.MaxAMDGPULimit or Scheduler.MaxNvidiaGPULimit.
Requesting GPUs when none are available causes content to fail to start. Contact the administrator if issues occur.