library(shiny)
library(httr)
library(jsonlite)
library(DT)
library(stringr)
library(tidyverse)
library(bslib)
library(janitor)
library(shinyjs)
library(shinycssloaders)

# Internal API key (replace with your actual API key)
OPENAI_API_KEY <- Sys.getenv("OPENAI_API_KEY")

ui <- page_fluid(
  theme = bs_theme(version = 5),
  useShinyjs(),  # Add this to use shinyjs
  br(),
  titlePanel("AI Dataset Generator"),
  sidebarLayout(
    sidebarPanel(
      textInput("description", "Describe the dataset you want",
                placeholder = "e.g., health data for a family of 4"),
      actionButton("generate", "Generate Dataset"),
      hidden(downloadButton("download", "Download CSV")),  # Hide download button initially
      br(), br(),
      uiOutput("summary"),
      hr(),
      tags$small("Note: Generated data may not be accurate or suitable for real-world use. The maximum number of records is limited to 25.")
    ),
    mainPanel(
      navset_tab(
        nav_panel("Data Table",
                  br(),
                DTOutput("dataset")
        )
      )
    )
  )
)

server <- function(input, output, session) {
  dataset <- reactiveVal(NULL)
  summary_text <- reactiveVal("")

  preprocess_csv <- function(csv_string) {
    # Extract only the CSV part
    csv_pattern <- "(?s)(.+?\\n(?:[^,\n]+(?:,[^,\n]+)*\n){2,})"
    csv_match <- str_extract(csv_string, csv_pattern)

    if (is.na(csv_match)) {
      stop("No valid CSV data found in the response")
    }

    lines <- str_split(csv_match, "\n")[[1]]
    lines <- lines[lines != ""]  # Remove empty lines

    # Get the number of columns from the header
    header <- str_split(lines[1], ",")[[1]]
    num_cols <- length(header)

    # Ensure all rows have the same number of columns
    processed_lines <- sapply(lines[-1], function(line) {  # Skip header
      cols <- str_split(line, ",")[[1]]
      if (length(cols) < num_cols) {
        cols <- c(cols, rep("", num_cols - length(cols)))
      } else if (length(cols) > num_cols) {
        cols <- cols[1:num_cols]
      }
      cols
    })

    # Create a tibble
    tibble(!!!setNames(as.list(as.data.frame(t(processed_lines))), header))
  }

  generate_summary <- function(df) {
    prompt <- paste("Summarize the following dataset:\n\n",
                    "Dimensions: ", nrow(df), "rows and", ncol(df), "columns\n\n",
                    "Variables:\n", paste(names(df), collapse=", "), "\n\n",
                    "Please provide a brief summary of the dataset dimensions and variable definitions. Keep it concise, about 3-4 sentences.")

    response <- POST(
      url = "https://api.openai.com/v1/chat/completions",
      add_headers(Authorization = paste("Bearer", OPENAI_API_KEY)),
      content_type_json(),
      body = toJSON(list(
        model = "gpt-3.5-turbo-0125",
        messages = list(
          list(role = "system", content = "You are a helpful assistant that summarizes datasets."),
          list(role = "user", content = prompt)
        )
      ), auto_unbox = TRUE),
      encode = "json"
    )

    if (status_code(response) == 200) {
      content <- content(response)
      summary <- content$choices[[1]]$message$content
      return(summary)
    } else {
      return("Error generating summary. Please try again later.")
    }
  }

  observeEvent(input$generate, {
    req(input$description)
    showPageSpinner()

    prompt <- paste("Generate a fake dataset with at least two variables as a CSV string based on this description:",
                    input$description, "Include a header row. Limit to 25 rows of data. Ensure all rows have the same number of columns. Do not include any additional text or explanations.")

    response <- POST(
      url = "https://api.openai.com/v1/chat/completions",
      add_headers(Authorization = paste("Bearer", OPENAI_API_KEY)),
      content_type_json(),
      body = toJSON(list(
        model = "gpt-3.5-turbo-0125",
        messages = list(
          list(role = "system", content = "You are a helpful assistant that generates fake datasets."),
          list(role = "user", content = prompt)
        )
      ), auto_unbox = TRUE),
      encode = "json"
    )

    if (status_code(response) == 200) {
      content <- content(response)
      csv_string <- content$choices[[1]]$message$content

      tryCatch({
        # Preprocess the CSV string and create a tibble
        df <- preprocess_csv(csv_string) %>% clean_names() %>%
          mutate(across(everything(), ~ ifelse(suppressWarnings(!is.na(as.numeric(.))), as.numeric(.), as.character(.))))
        dataset(df)
        updateSelectInput(session, "variable", choices = names(df))

        # Generate and set summary
        summary <- generate_summary(df)
        summary_text(summary)

        # Show download button
        hidePageSpinner()
        shinyjs::show("download")


      }, error = function(e) {
        showNotification(paste("Error parsing CSV:", e$message), type = "error")
      })
    } else {
      showNotification("Error generating dataset. Please try again later.", type = "error")
    }

    # Hide loading spinner
    shinyjs::hide("loading-spinner")
  })

  output$dataset <- renderDT({
    req(dataset())
    datatable(dataset(), rownames = FALSE, options = list(pageLength = 10))
  })


  output$download <- downloadHandler(
    filename = function() {
      "generated_dataset.csv"
    },
    content = function(file) {
      req(dataset())
      write.csv(dataset(), file, row.names = FALSE)
    }
  )

  output$summary <- renderUI({
    req(summary_text())
    div(
      h4("Dataset Summary"),
      p(summary_text()),
      style = "background-color: #f0f0f0; padding: 10px; border-radius: 5px;"
    )
  })
}

shinyApp(ui, server)Deploy a LLM-powered Shiny for R App with Secrets
This tutorial builds a Shiny for R application that is powered by an OpenAI API key before deploying it to Posit Connect Cloud. Code is available on GitHub.
1. Create a new GitHub repository
Sign in to GitHub and create a new, public repository.
2. Start a new RStudio project
In RStudio:
- Click New Project from the File menu
- Select Version Control
- Select Git
- Paste the URL to your repository in the Repository URL field
- Enter a Desired Project directory name
- Confirm or change the subdirectory location
Now that your project is synced with your GitHub repository, you are ready to begin coding.
From the New File dropdown or the New File option from the File menu:
- Select R Script
- Save the blank file as
app.R
3. Build the application
Copy and paste the code below into app.R.
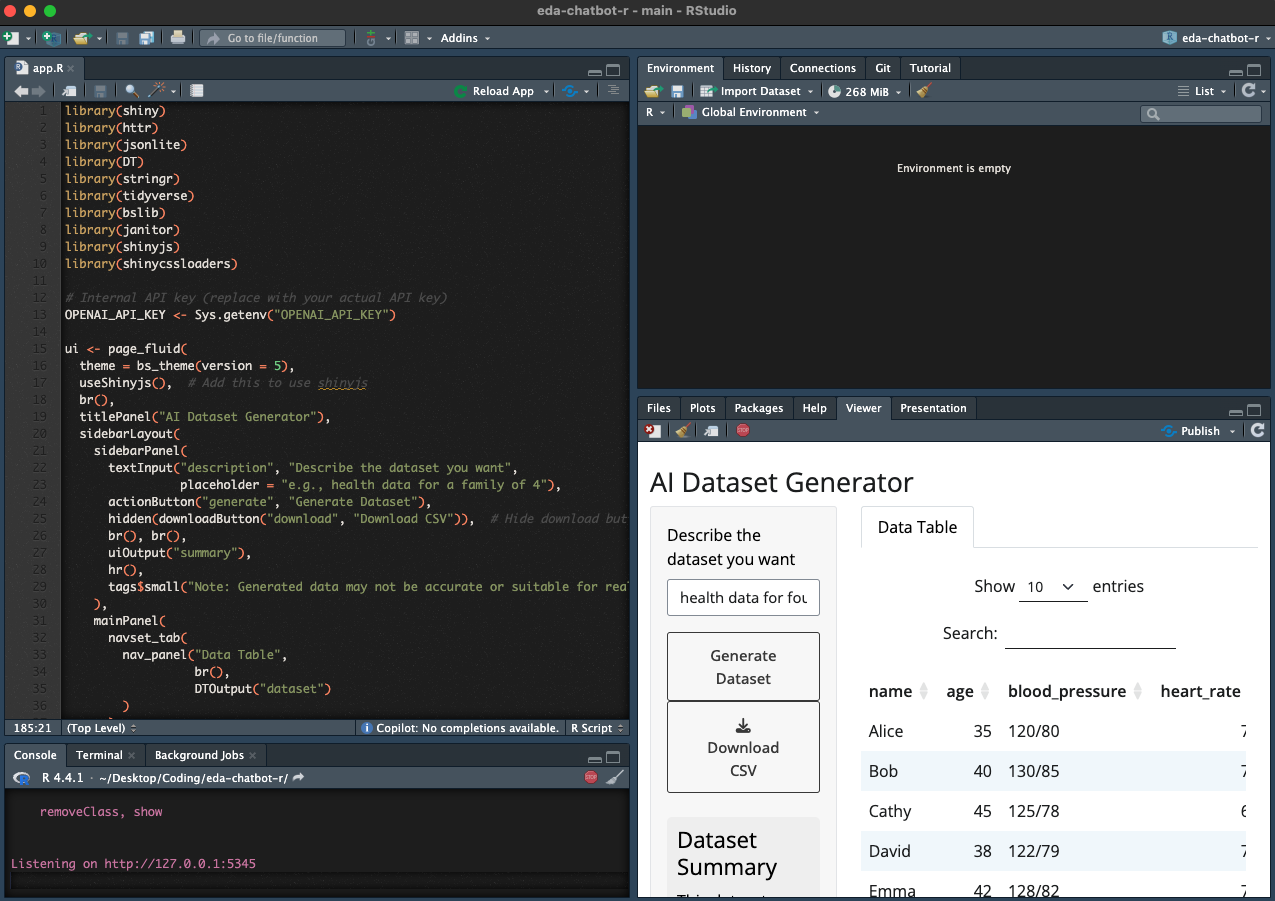
The application relies on an API key from OpenAI, which is called at the top of app.R with OPENAI_API_KEY <- Sys.getenv("OPENAI_API_KEY").
Using a dedicated environment variable file helps keep your secret key out of the application source code. This is important because we will ultimately push it to a public GitHub repository.
Create a file named .Renviron and add your API key for this project. Learn more about creating the API key here.
OPENAI_API_KEY='your-api-key-here'If it doesn’t already exist in your project, create a .gitignore file so that you don’t accidently share the environment variable file publicly. Add the following to it.
.Rproj.user
.Rhistory
.RData
.Ruserdata
.Renviron
4. Preview the application
In RStudio when looking at app.R, click the Run button. This previews your application locally.

Add dependency file
The last thing you need to do is create a dependency file that will provide Connect Cloud with enough information to rebuild your content during deployment. Although there are multiple approaches to achieve this, Connect Cloud exclusively uses a manifest.json file.
To create this file, load the rsconnect library and run the writeManifest() function.
rsconnect::writeManifest()This function creates a .json file named manifest.json that will tell Connect Cloud (1) what version of R to use and (2) what packages and versions are required.
5. Push to GitHub
Now that everything looks good and we’ve created a file to help reproduce your local environment, it is time to get the code on GitHub.
- Navigate to the Git tab in your RStudio project
- Click Commit
- Select the checkbox to stage each new or revised file
- Enter a commit message
- Click Commit
- Click the Push icon
Your repository now has everything it needs for Connect Cloud.
6. Deploy to Posit Connect Cloud
Follow the steps below to deploy your project to Connect Cloud.
Sign in to Connect Cloud.
Click the Publish icon button on the top of your Home page
Select Shiny
Select the public repository that you created in this tutorial
Confirm the branch
Select app.R as the primary file
Click Advanced settings
Click “Add variable” under “Configure variables”
In the Name field, add
OPENAI_API_KEYIn the Value field, add your secret OpenAI API key
Click Publish
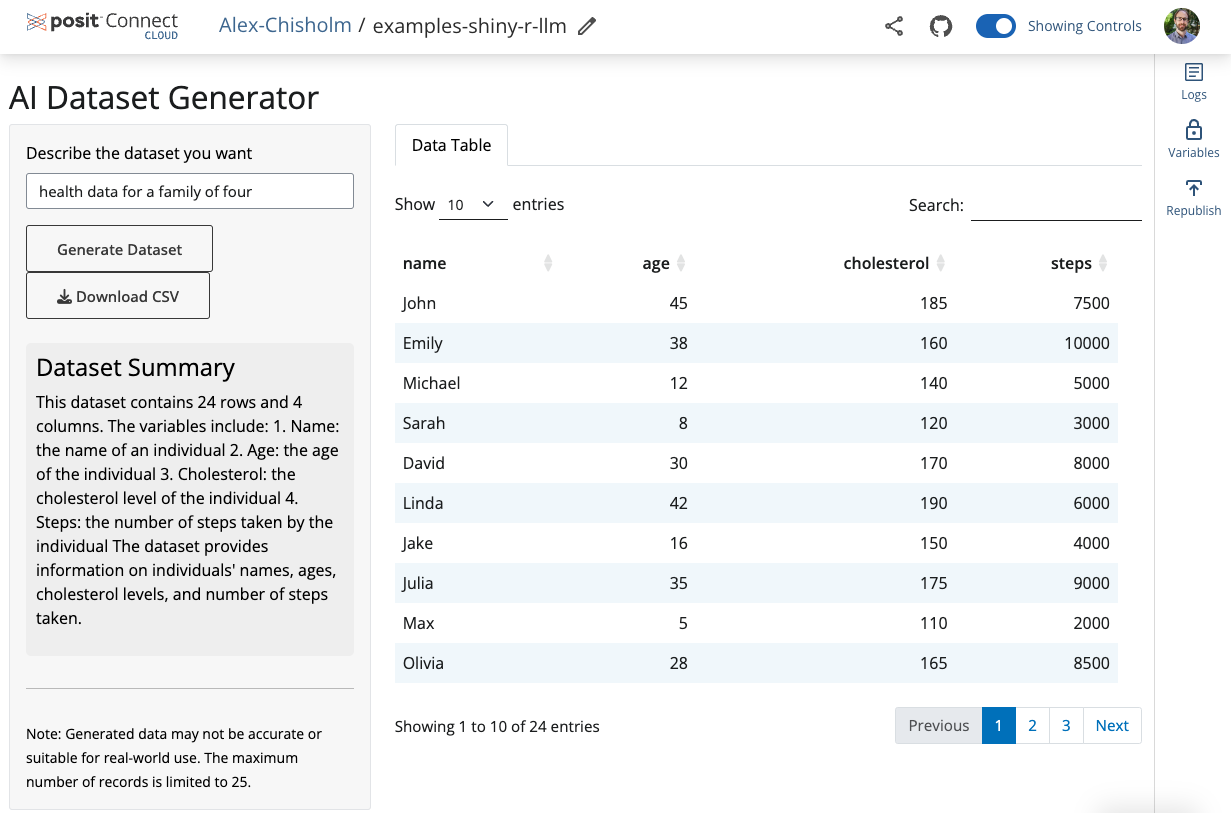
Publishing will display status updates during the deployment process. You will also find build logs streaming on the lower part of the screen.
Congratulations! You successfully deployed to Connect Cloud and are now able to share the link with others.

7. Republish the application
If you update the code to your application or the underlying data source, commit and push the changes to your GitHub repository.
Once the repository has the updated code, you can republish the application on Connect Cloud by going to your Content List and clicking the republish icon.