Deploy an LLM-powered Shiny for Python app to Connect Cloud
You have a Shiny for Python app that calls the OpenAI API.
Your API key works like a password: anyone who has it can use your OpenAI account. So keep it out of your code and your GitHub repository.
Instead, you enter the key in Connect Cloud. Connect Cloud stores it encrypted and passes it to your app when the app runs. The app reads it by name from the OPENAI_API_KEY environment variable. This guide shows how to enter the key for each way of deploying.
The sample app generates a fake dataset from your description, summarizes it, and lets you download it as a CSV file.
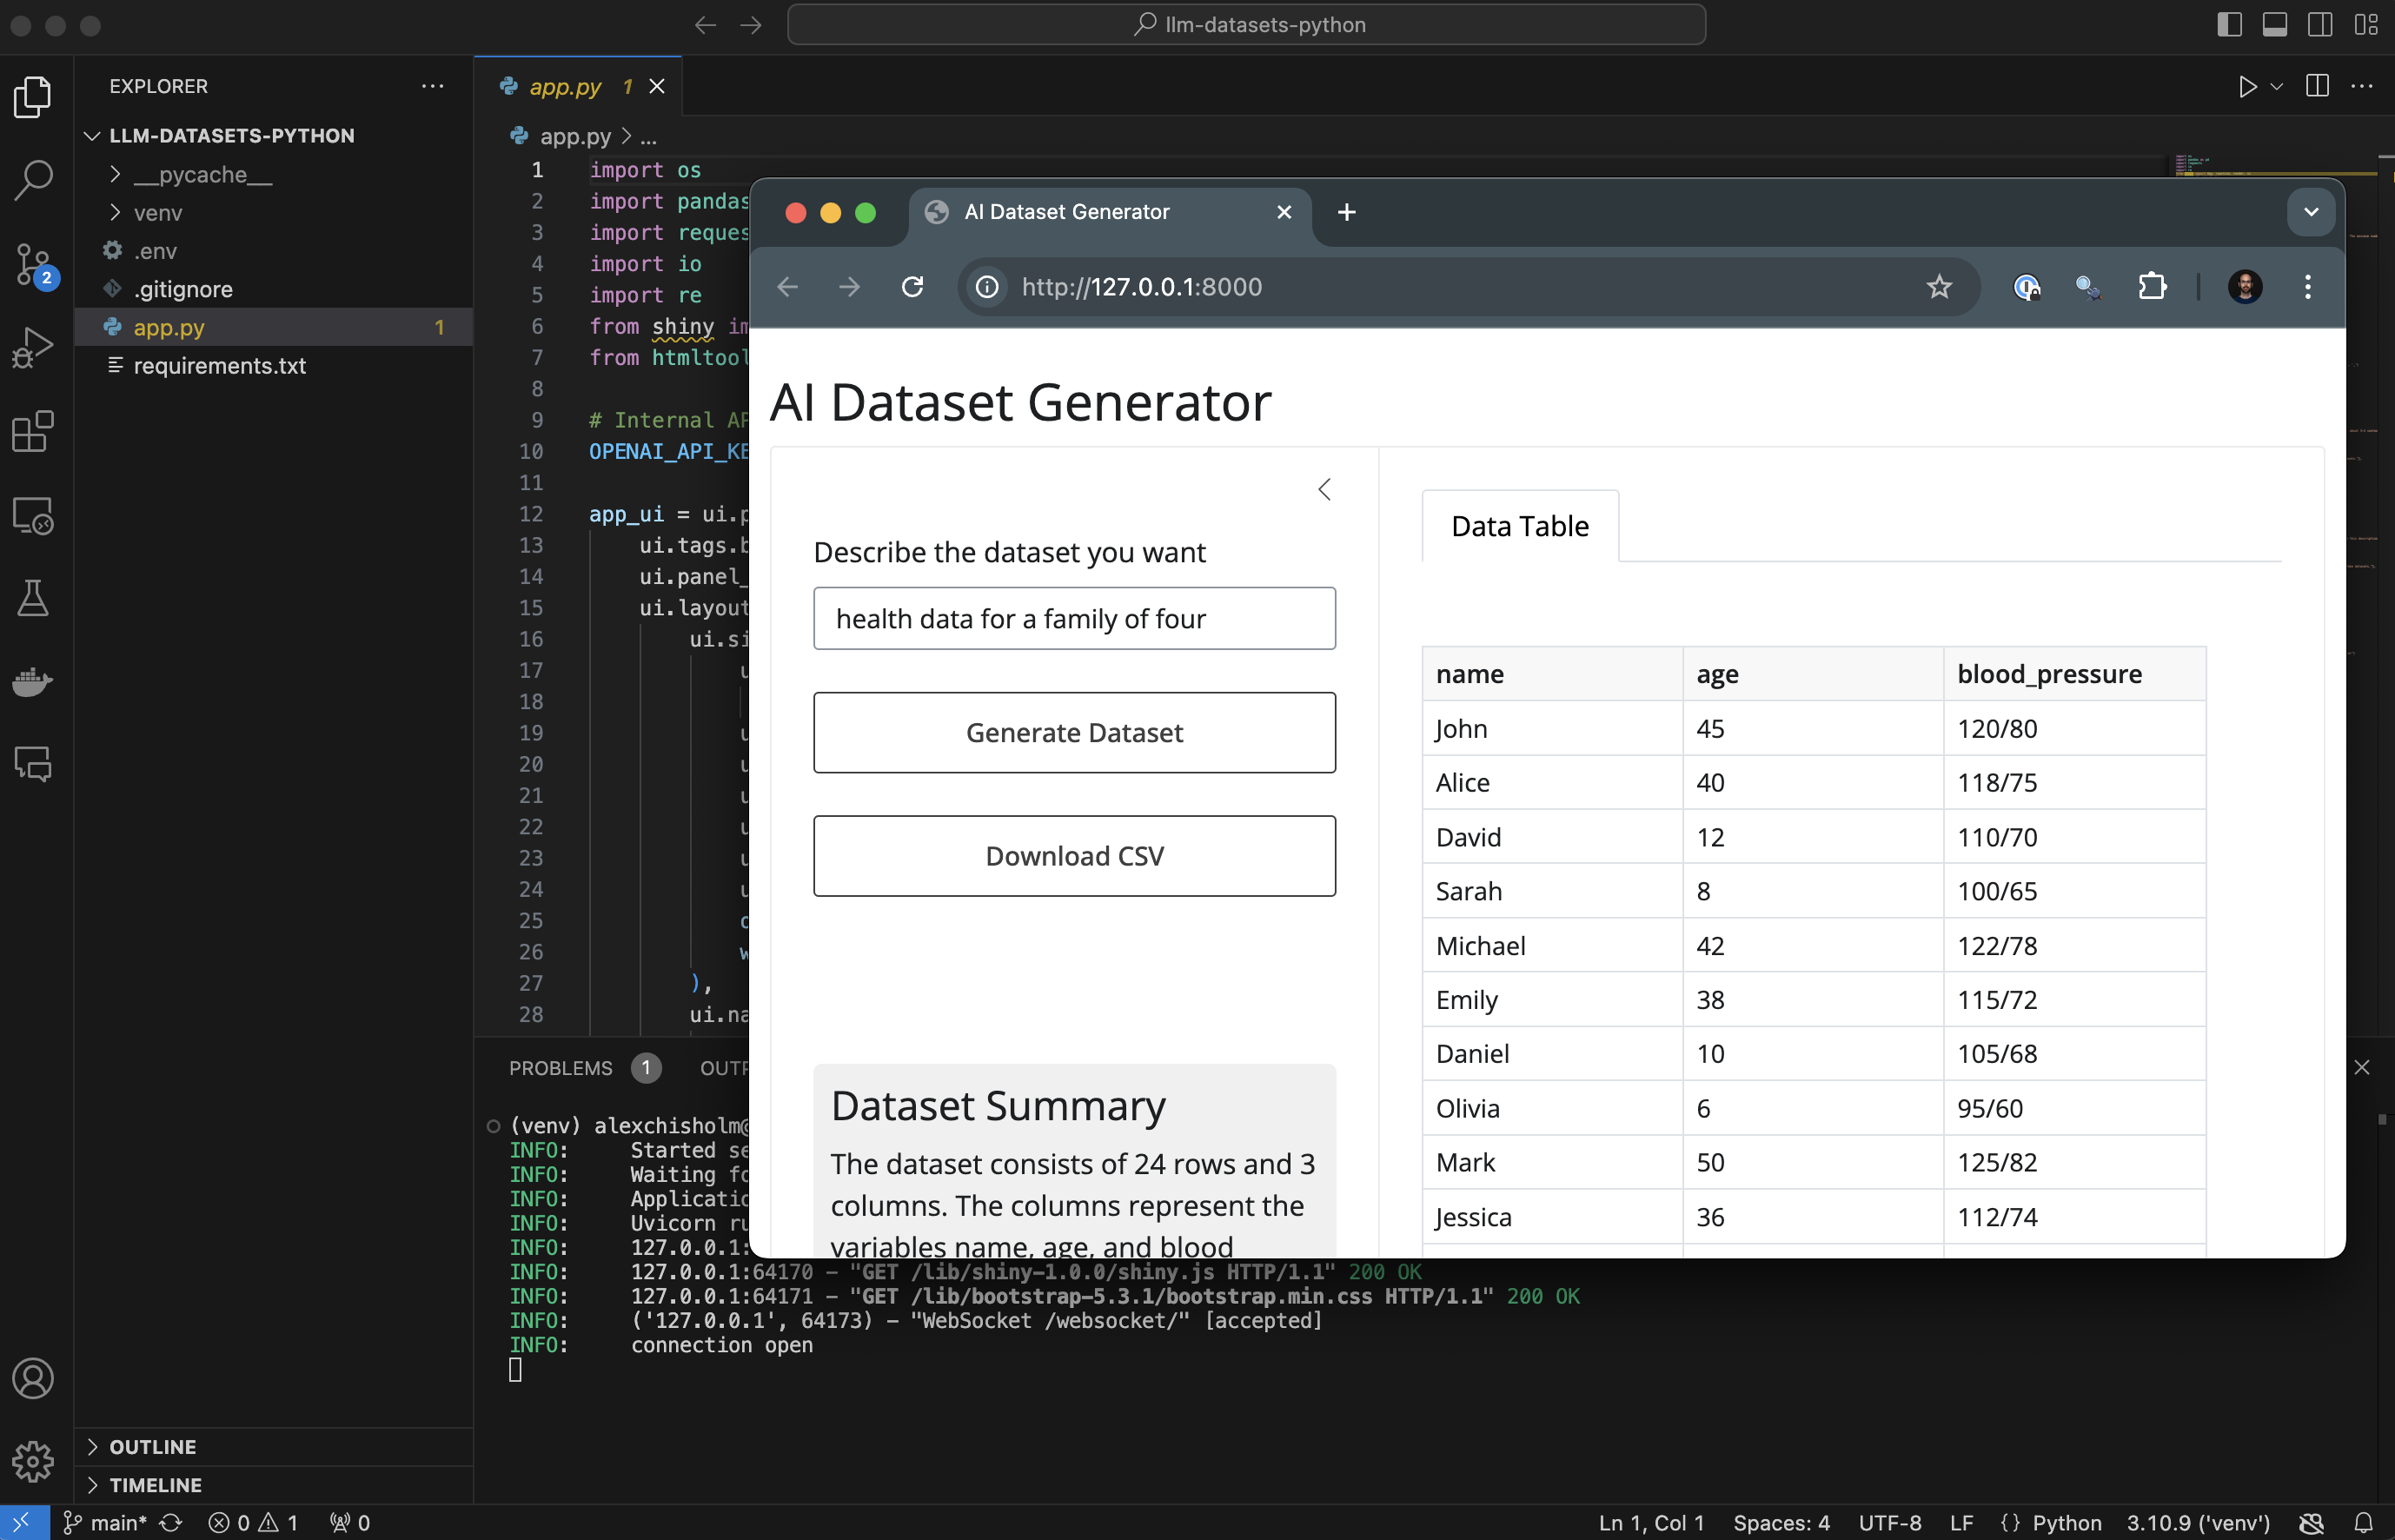
The source code is available in the examples-shiny-python-llm repository.
Getting started
Whichever method you choose, you need the following:
A Connect Cloud account.
An OpenAI API key. See the OpenAI quickstart.
A Shiny for Python app that reads the key from the
OPENAI_API_KEYenvironment variable. This guide uses the sample app, which has a main file (Connect Cloud calls it the primary file) namedapp.py.A
requirements.txtfile that lists the Python packages you use, in the same folder asapp.py. The sample app needs the following packages:requirements.txt
shiny==1.1.0
pandas==2.2.3
requests==2.32.3
Save this file as app.py. It reads your key with os.environ.get("OPENAI_API_KEY").
app.py
import os
import pandas as pd
import requests
import io
import re
from shiny import App, reactive, render, ui
from htmltools import css

# Internal API key (replace with your actual API key)
OPENAI_API_KEY = os.environ.get("OPENAI_API_KEY")

app_ui = ui.page_fluid(
    ui.tags.br(),
    ui.panel_title("AI Dataset Generator"),
    ui.layout_sidebar(
        ui.sidebar(
            ui.input_text("description", "Describe the dataset you want",
                          placeholder="e.g., health data for a family of 4"),
            ui.input_action_button("generate", "Generate Dataset"),
            ui.output_ui("download_button"),  # New output for dynamic button
            ui.tags.br(), ui.tags.br(),
            ui.output_ui("summary"),
            ui.tags.hr(),
            ui.tags.small("Note: Generated data may not be accurate or suitable for real-world use. The maximum number of records is limited to 25."),
            open="open",
            width=350
        ),
        ui.navset_tab(
            ui.nav_panel("Data Table",
                ui.tags.br(),
                ui.output_data_frame("dataset_output")
            )
        )
)
)

def server(input, output, session):
    dataset_rv = reactive.value(None)
    summary_text = reactive.value("")
    show_download_button = reactive.value(False)  # New reactive value


    def preprocess_csv(csv_string):
        # Extract only the CSV part
        csv_pattern = r"(?s)(.+?\n(?:[^,\n]+(?:,[^,\n]+)*\n){2,})"
        csv_match = re.search(csv_pattern, csv_string)

        if not csv_match:
            raise ValueError("No valid CSV data found in the response")

        csv_data = csv_match.group(1)

        try:
            df = pd.read_csv(io.StringIO(csv_data))
        except pd.errors.EmptyDataError:
            raise ValueError("The CSV data is empty or malformed")
        except pd.errors.ParserError:
            raise ValueError("Unable to parse the CSV data")

        # Clean column names
        df.columns = df.columns.str.lower().str.replace(r'[^\w\s]', '', regex=True).str.replace(' ', '_')

        # Convert numeric columns
        for col in df.columns:
            try:
                df[col] = pd.to_numeric(df[col])
            except ValueError:
                pass

        return df

    def generate_summary(df):
        prompt = f"""Summarize the following dataset:

Dimensions: {df.shape[0]} rows and {df.shape[1]} columns

Variables:
{', '.join(df.columns)}

Please provide a brief summary of the dataset dimensions and variable definitions. Keep it concise, about 3-4 sentences."""

        response = requests.post(
            "https://api.openai.com/v1/chat/completions",
            headers={"Authorization": f"Bearer {OPENAI_API_KEY}"},
            json={
                "model": "gpt-3.5-turbo-0125",
                "messages": [
                    {"role": "system", "content": "You are a helpful assistant that summarizes datasets."},
                    {"role": "user", "content": prompt}
                ]
            }
        )

        if response.status_code == 200:
            content = response.json()
            summary = content['choices'][0]['message']['content']
            return summary
        else:
            return "Error generating summary. Please try again later."

    @reactive.Effect
    @reactive.event(input.generate)
    def _():
        description = input.description()
        if not description:
            return

        with ui.Progress(min=1, max=3) as p:
            p.set(1, message="Generating dataset...")

            prompt = f"Generate a fake dataset with at least two variables as a CSV string based on this description: {description} Include a header row. Limit to 25 rows of data. Ensure all rows have the same number of columns. Do not include any additional text or explanations."

            response = requests.post(
                "https://api.openai.com/v1/chat/completions",
                headers={"Authorization": f"Bearer {OPENAI_API_KEY}"},
                json={
                    "model": "gpt-3.5-turbo-0125",
                    "messages": [
                        {"role": "system", "content": "You are a helpful assistant that generates fake datasets."},
                        {"role": "user", "content": prompt}
                    ]
                }
            )

            if response.status_code == 200:
                content = response.json()
                csv_string = content['choices'][0]['message']['content']

                try:
                    p.set(2, message="Processing data...")
                    df = preprocess_csv(csv_string)
                    dataset_rv.set(df)

                    p.set(3, message="Generating summary...")
                    summary = generate_summary(df)
                    summary_text.set(summary)

                    show_download_button.set(True)  # Show the download button


                except Exception as e:
                    ui.notification_show(f"Error processing data: {str(e)}", type="error")
            else:
                ui.notification_show("Error generating dataset. Please try again later.", type="error")

    @output
    @render.data_frame
    def dataset_output():
        df = dataset_rv()
        if df is not None:
            return df
        return None

    @output
    @render.download(filename="generated_dataset.csv")
    def download():
        df = dataset_rv()
        if df is not None:
            return io.BytesIO(df.to_csv(index=False).encode())
        return io.BytesIO(b"No data available")  # Return an empty file if no data

    @output
    @render.ui
    def download_button():
        if show_download_button():
            return ui.download_button("download", "Download CSV")
        return None

    @output
    @render.ui
    def summary():
        if summary_text():
            return ui.div(
                ui.h4("Dataset Summary"),
                ui.p(summary_text()),
                style=css(
                    background_color="#f0f0f0",
                    padding="10px",
                    border_radius="5px"
                )
            )

app = App(app_ui, server)
To preview the app before you deploy, set your key as an environment variable in the terminal, then run the app. Setting it this way keeps the key out of your project files.
Terminal
export OPENAI_API_KEY='your-api-key-here'
pip install -r requirements.txt
shiny run app.py
Choose a deployment method
| Method | When to use it | Jump to |
|---|---|---|
| GitHub | Your code is on GitHub and you want it to update when you push (public repositories only on free accounts) | Deploy from GitHub |
| Posit Publisher | You work in Positron or VS Code and do not use GitHub | Deploy from Positron or VS Code |
| rsconnect-python | You want to deploy from a terminal or automate deployments | Deploy from the command line |
For more on how these methods differ, see Publishing.
Deploy from GitHub
Use this method when your app’s code is in a GitHub repository and you want changes you push to publish automatically. On a free account, your repository must be public, so anyone can see your code.
- Commit
app.pyandrequirements.txt, then push your app to a GitHub repository. Make sure no file you commit contains your API key. - Sign in to Connect Cloud.
- Click Publish at the top of your Home page. If this is your first time publishing, Connect Cloud prompts you to install the GitHub App, which lets Connect Cloud read your repository.
- Select Shiny.
- Select your repository.
- Check that Branch is the branch that has your content, usually
main. - Select
app.pyas the Primary file. - Leave Automatically publish on push on if you want Connect Cloud to update what you published each time you push to this branch. Turn it off to update only when you choose.
- Click Advanced settings.
- Click Add variable under Configure variables.
- In the Name field, enter
OPENAI_API_KEY. - In the Value field, enter your OpenAI API key.
- Click Publish.
- Result: Connect Cloud shows a log of the install steps while it deploys. When it finishes, your app is live at an address like
https://[content-id].share.connect.posit.cloud, where[content-id]is a unique identifier that Connect Cloud picks. You can set a custom name to change the URL. - Update or redeploy: Commit and push to the connected branch and Connect Cloud republishes automatically. If you turned off automatic publishing, click Republish on the content’s card on your Home page. See Republishing.
For all options, see Publish from GitHub.
Deploy from Positron or VS Code
Use this method when you work in Positron or VS Code and want to deploy your app directly. Positron includes the Posit Publisher extension. In VS Code, install it from the marketplace first.
- Open your project folder in Positron, or in VS Code with Posit Publisher installed.
- Click the Posit Publisher icon in the Activity Bar.
- Next to CREDENTIALS, click + and select Posit Connect Cloud. A credential is a saved connection to your Connect Cloud account. Your browser opens.
- In your browser, check that the Authorize Access code matches the code in Positron or VS Code. Then click Continue and Authorize.
- Return to Positron or VS Code and accept or change the name for this credential. Do this once.
- Click the + next to Deployments. If Posit Publisher asks which file to publish, select
app.py. - Enter a title for your content, then select the credential you just added.
- Under PROJECT FILES, check that the list includes
app.pyandrequirements.txtbut not any file that holds your API key, such as.env. Connect Cloud uploads only the files in this list. - Under Secrets, add a secret named
OPENAI_API_KEYwith your API key as the value. - Click Deploy Your Project.
- Result: A success message appears in the lower right of Positron or VS Code. Click View Content in the extension to open the app on Connect Cloud. Its address has the form
https://[content-id].share.connect.posit.cloud, where[content-id]is unique to your app. - Update or redeploy: Save your changes, open Posit Publisher, select the previous deployment, and click Deploy Your Project again. Keep the
.positfolder in your project. It remembers which Connect Cloud content this project publishes to, so the next deploy updates the same content instead of creating a new one.
For the configuration file, multiple deployments per project, and troubleshooting, see Publish from your IDE.
Deploy from the command line
Use this method to deploy from a terminal or to automate deployments, for example, from a script. It requires rsconnect-python version 1.31.0 or higher.
Install the
rsconnect-pythoncommand-line tool.Terminal
pip install rsconnect-pythonAdd your Connect Cloud account. Replace
<YOUR_ACCOUNT_HERE>with your account name from your account page. Your browser opens for you to authorize access.Terminal
rsconnect add --connect-cloud \
  --account "<YOUR_ACCOUNT_HERE>" \
  --name cloud
Deploy the folder that contains
app.pyandrequirements.txt.Terminal
rsconnect deploy shiny . --name cloudAdd your API key as a variable. Open the content’s content settings, click Add variable, enter
OPENAI_API_KEYas the name, and enter your API key as the value. Then republish the app so it picks up the key. Until then, the app shows an error.
- Result: The command prints the URL of your content. Open the URL to see the content’s page on Connect Cloud. Add
--quietto print only the URL. - Update or redeploy: Run the same
rsconnect deploycommand again. The directory remembers where you deployed, so you can omit--name.
For noninteractive credentials, examples for automated builds, and other options, see Publish from your console or terminal.
After you deploy
Common things to set up next. They work the same however you deployed your app:
- Passwords and API keys: Change or add secret variables under Variables in content settings. The app reads the key with
os.environ.get("OPENAI_API_KEY"). - Access and sharing: Control who can view your app in Sharing.
- Scheduling: On paid plans, schedule your app to republish at set times.
- Custom name and domain: Change the app’s URL with a custom name or a custom domain.
- Upload size limit: The upload size limit applies when you upload your project files from your editor or the command line.
Troubleshooting
- Error generating dataset or summary: The app shows these messages when OpenAI returns an error, for example when the key is missing or invalid. Check that the variable is named exactly
OPENAI_API_KEYand that its value is a valid key. - Missing package error: Add the package to
requirements.txtand republish. Make sure the file is in the same directory asapp.py. - API key committed by mistake: Revoke the key in your OpenAI account, create a new one, and store the new key as a variable on Connect Cloud.
- Repository not listed: Confirm that the GitHub App has access to it.
- The deploy command stops before uploading: The folder you are deploying needs a
requirements.txtfile. See Create a requirements.txt file.
If your deployment still fails, read the log that Connect Cloud shows while it deploys and look for the first error. You can also try Error Assist, which gives guidance based on your log output.