Managed credentials
Overview
This page is for administrators who deploy and configure Posit products, though the mental model applies to anyone who uses managed credentials. It explains the capability and the thinking behind it.
This page does not cover setup. For configuration steps, see the product admin guides linked under Next steps.
Posit Workbench and Posit Connect can connect your users to external services, such as Amazon Web Services (AWS), Microsoft Azure, Databricks, and Snowflake, without storing long-lived secrets in code. Both products do this by brokering short-lived, scoped credentials on behalf of each user.
Managed credentials let a Posit product obtain access to an external service for a user, then hand that access to the user’s session or to deployed content. The product requests a credential from the external service, the external service issues a short-lived token, and the product passes that token to the code that needs it.
This capability provides the following benefits:
- No secrets in code: Users and publishers do not embed Application Programming Interface (API) keys or personal access tokens in scripts, notebooks, or apps.
- Per-user, scoped access: Each token represents a specific identity, so the external service grants only the access that identity already has.
- Short-lived tokens: Tokens expire on their own, which limits exposure if a token leaks.
- Centralized management: Administrators define access in the external service once, rather than coordinating credentials across many users or many pieces of content.
Supported external services
Managed credentials support external services that use OAuth 2.0 or related federation standards, including:
- Amazon Web Services
- Microsoft Azure
- Databricks
- Snowflake
- Custom OAuth 2.0 services
Support varies by product and service. For the supported services and configuration details, see the admin guides under Next steps.
Credential broker, not permission enforcer
It is important to understand that a Posit product acts as a credential broker, not a permission enforcer.
A product securely obtains and delivers tokens. It does not decide what those tokens can access. The external service defines and enforces permissions based on the identity carried by the token. If a user can read only certain tables in Snowflake, for instance, that user can read only those tables through a Posit product. The product cannot grant more access than the external service allows.
How a credential flows
Three parties work together whenever a Posit product brokers a credential:
- The user, whose identity determines what data they can access
- The Posit product (Workbench or Connect), which acts as the credential broker
- The external service (such as AWS or Snowflake), which holds the data and enforces access
The flow follows the same pattern in both Workbench and Connect:
- The user proves their identity by signing in or granting consent, through either an identity provider or the external service.
- The external service validates that identity and issues a short-lived credential scoped to it. Some services first issue an identity token that the Posit product exchanges for the credential, as described in the note below.
- The Posit product receives the credential and holds it securely.
- The Posit product passes the credential to the user’s session or to deployed content, which uses it to call the external service.
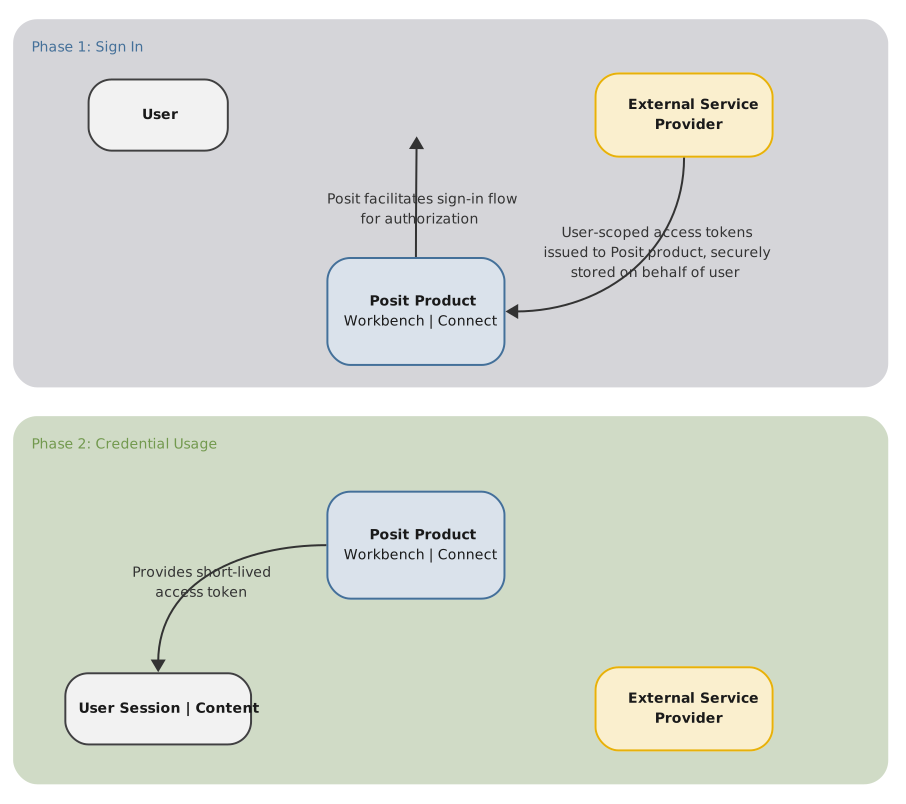
Posit products use established identity standards to broker credentials. The identity provider issues an OpenID Connect (OIDC) identity token, a signed JSON Web Token (JWT) that names its issuer and intended audience. The external service validates that token before issuing a credential. For example, AWS exchanges the identity token for temporary credentials through Security Token Service (STS) web identity federation. AWS validates the issuer and audience against an Identity and Access Management (IAM) trust policy.
How each product handles credentials
Workbench and Connect both broker credentials, but they do so at different stages of the content lifecycle.
Workbench
Workbench brokers credentials during development. When a data scientist works in an interactive session, Workbench obtains credentials for the external service and makes them available to the session. For its advanced integrations (AWS, Databricks, and Snowflake), Workbench sets environment variables and configuration files, so platform tools and software development kits (SDKs) work without extra code. Other integrations, such as Azure and custom OAuth, provide tokens through the posit-sdk or rstudioapi packages. In all cases, the credentials represent the developer’s own identity.
Connect
Connect brokers credentials for deployed content. When content runs, Connect provides it with a short-lived token to reach the external service. Connect can use the identity of the person viewing the content, so each viewer sees only the data their identity allows. Connect can also use a shared service identity, so every viewer sees the same data.
Key differences
| Workbench | Connect | |
|---|---|---|
| When used | While developing content in an interactive session | When deployed content runs |
| Whose identity | The developer’s own identity | The viewer’s identity, or a shared service identity |
| Who configures it | Users configure their own credentials | Administrators create integrations, and publishers attach them to content |
| Where the token goes | The user’s session | The running content |
A typical workflow uses both products. A data scientist uses managed credentials in Workbench to reach Snowflake while building a Shiny app. They publish the app to Connect. An administrator configures a Snowflake integration in Connect, and the publisher attaches it to the app. When a viewer opens the app, Connect brokers a Snowflake credential for that viewer’s identity.
In short, Workbench helps the developer build content that reaches external data, and Connect helps that content run securely once deployed.
Next steps
- Configure managed credentials in Workbench: see the Workbench managed credentials documentation.
- Configure credential access in Connect: see the Connect integrations documentation.
- Set up access on the external service: follow the service provider documentation referenced from each product’s admin guide.